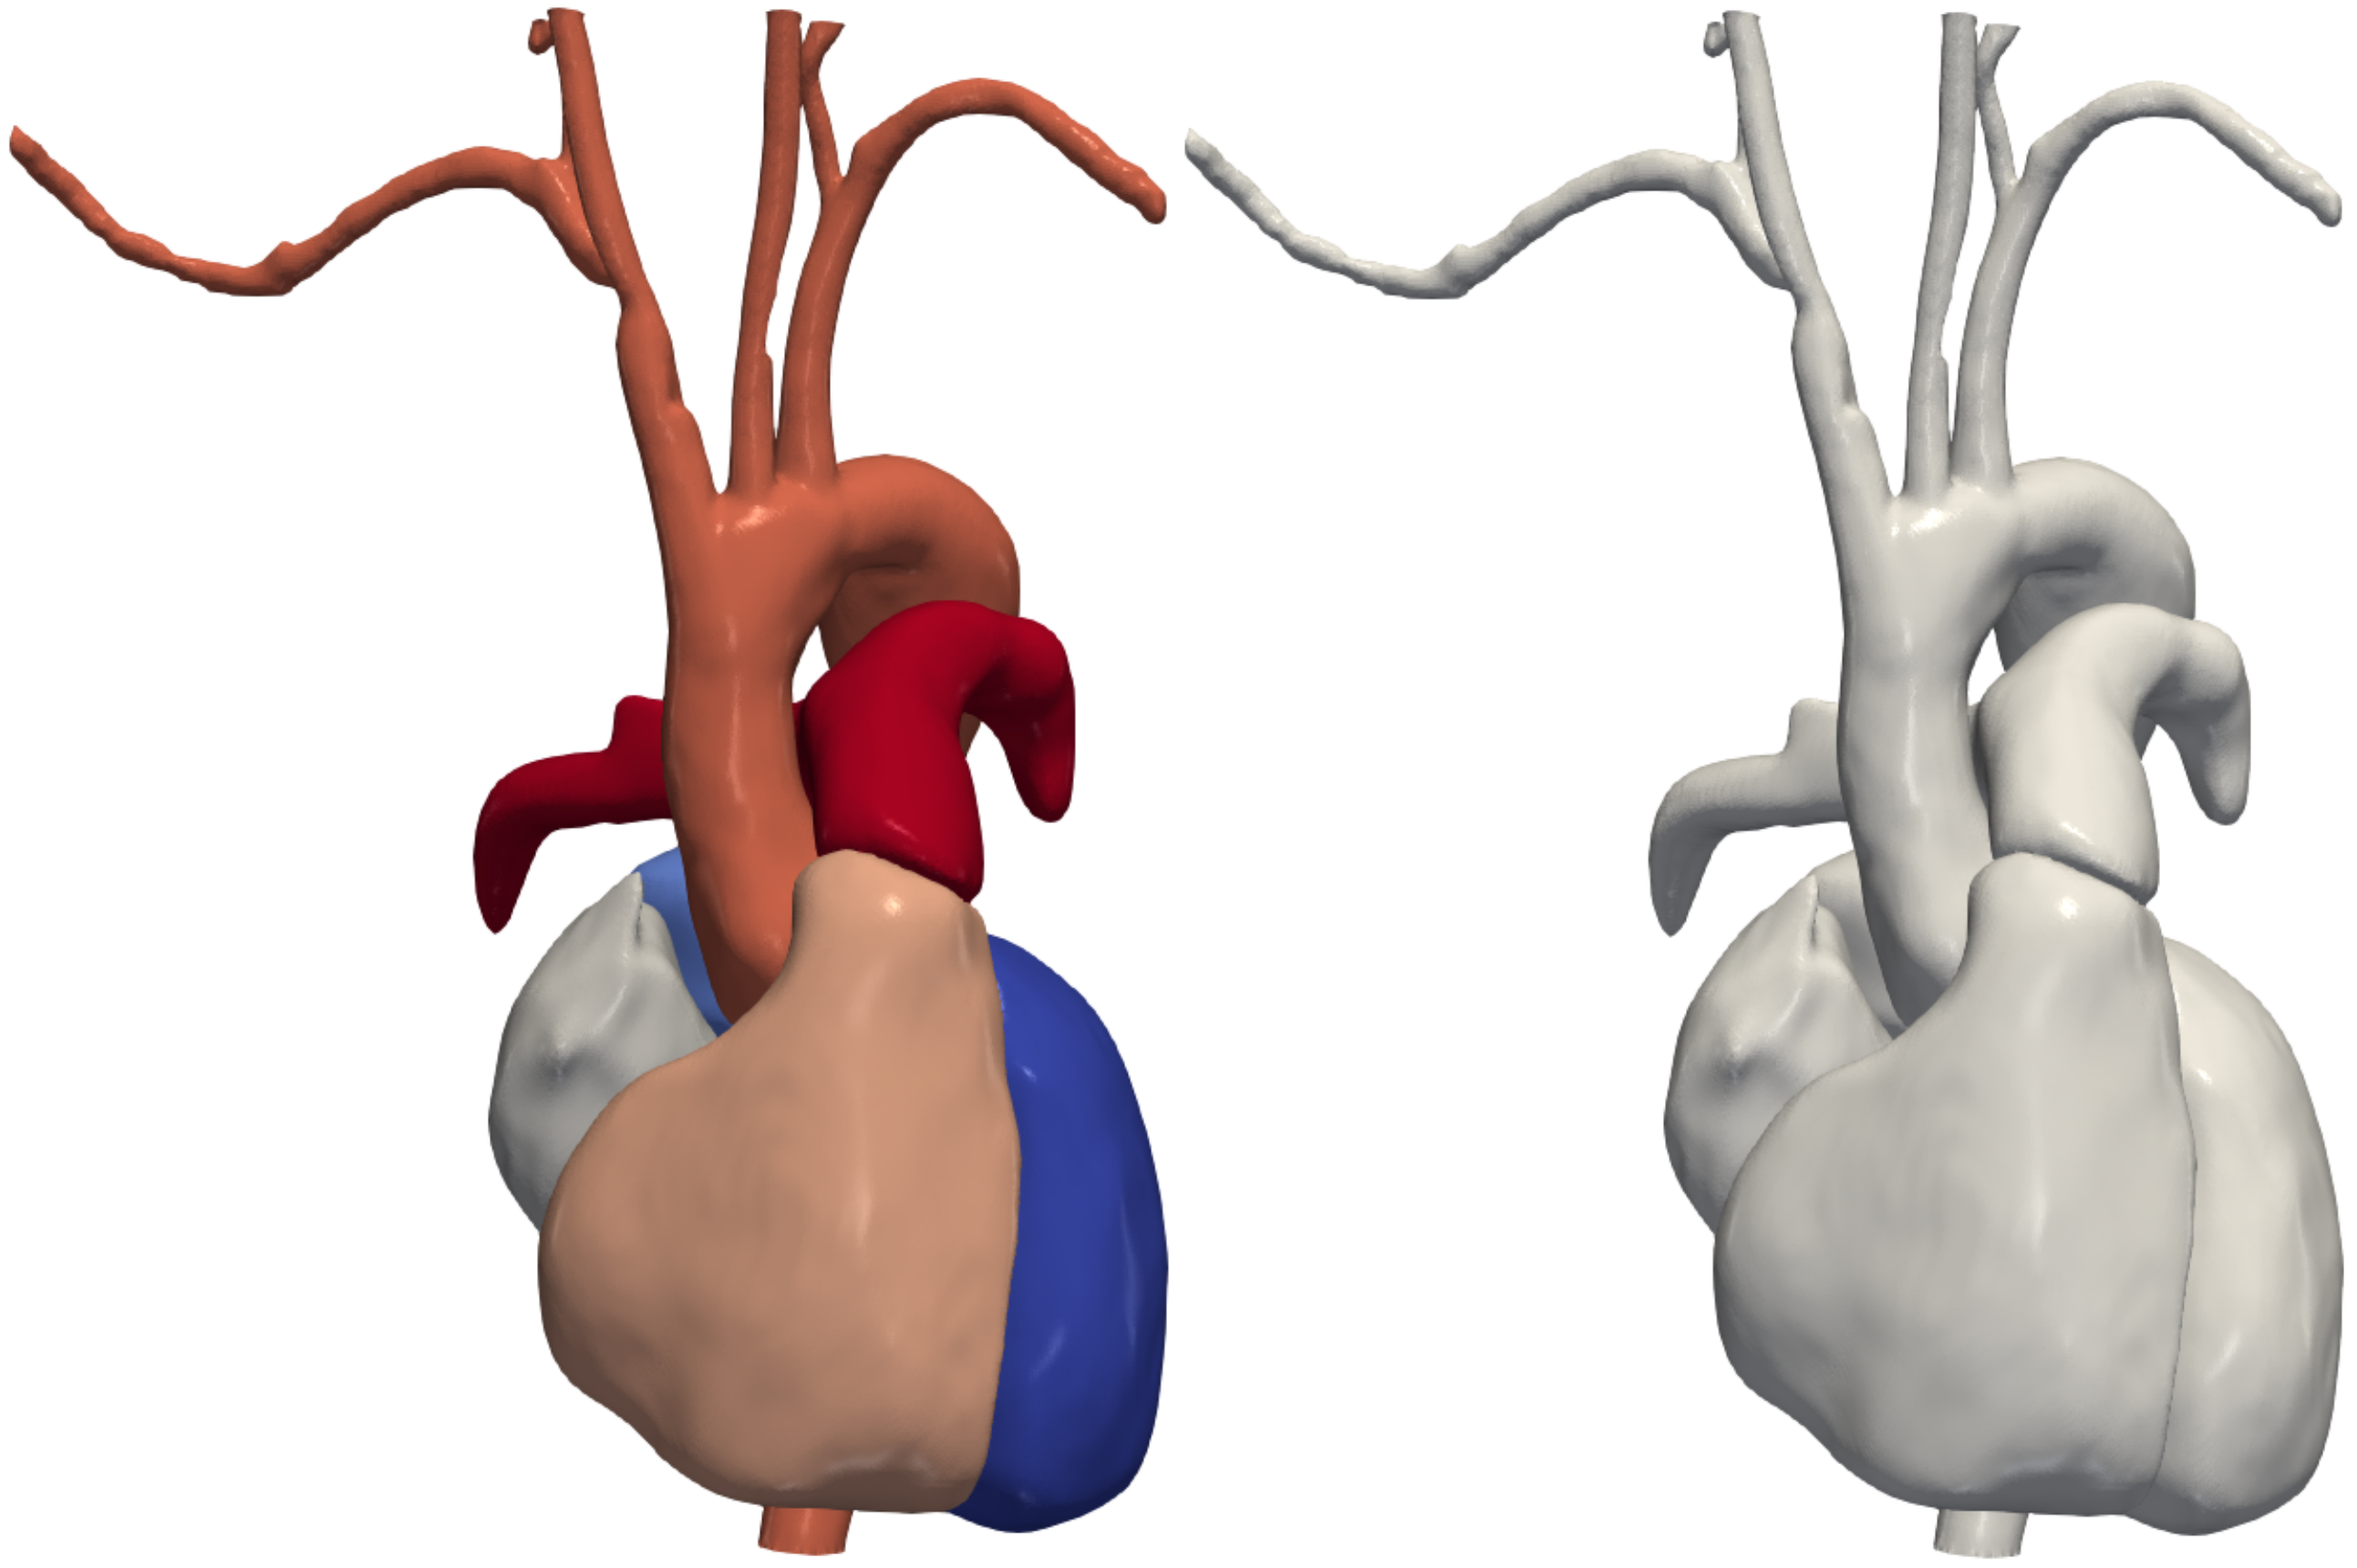
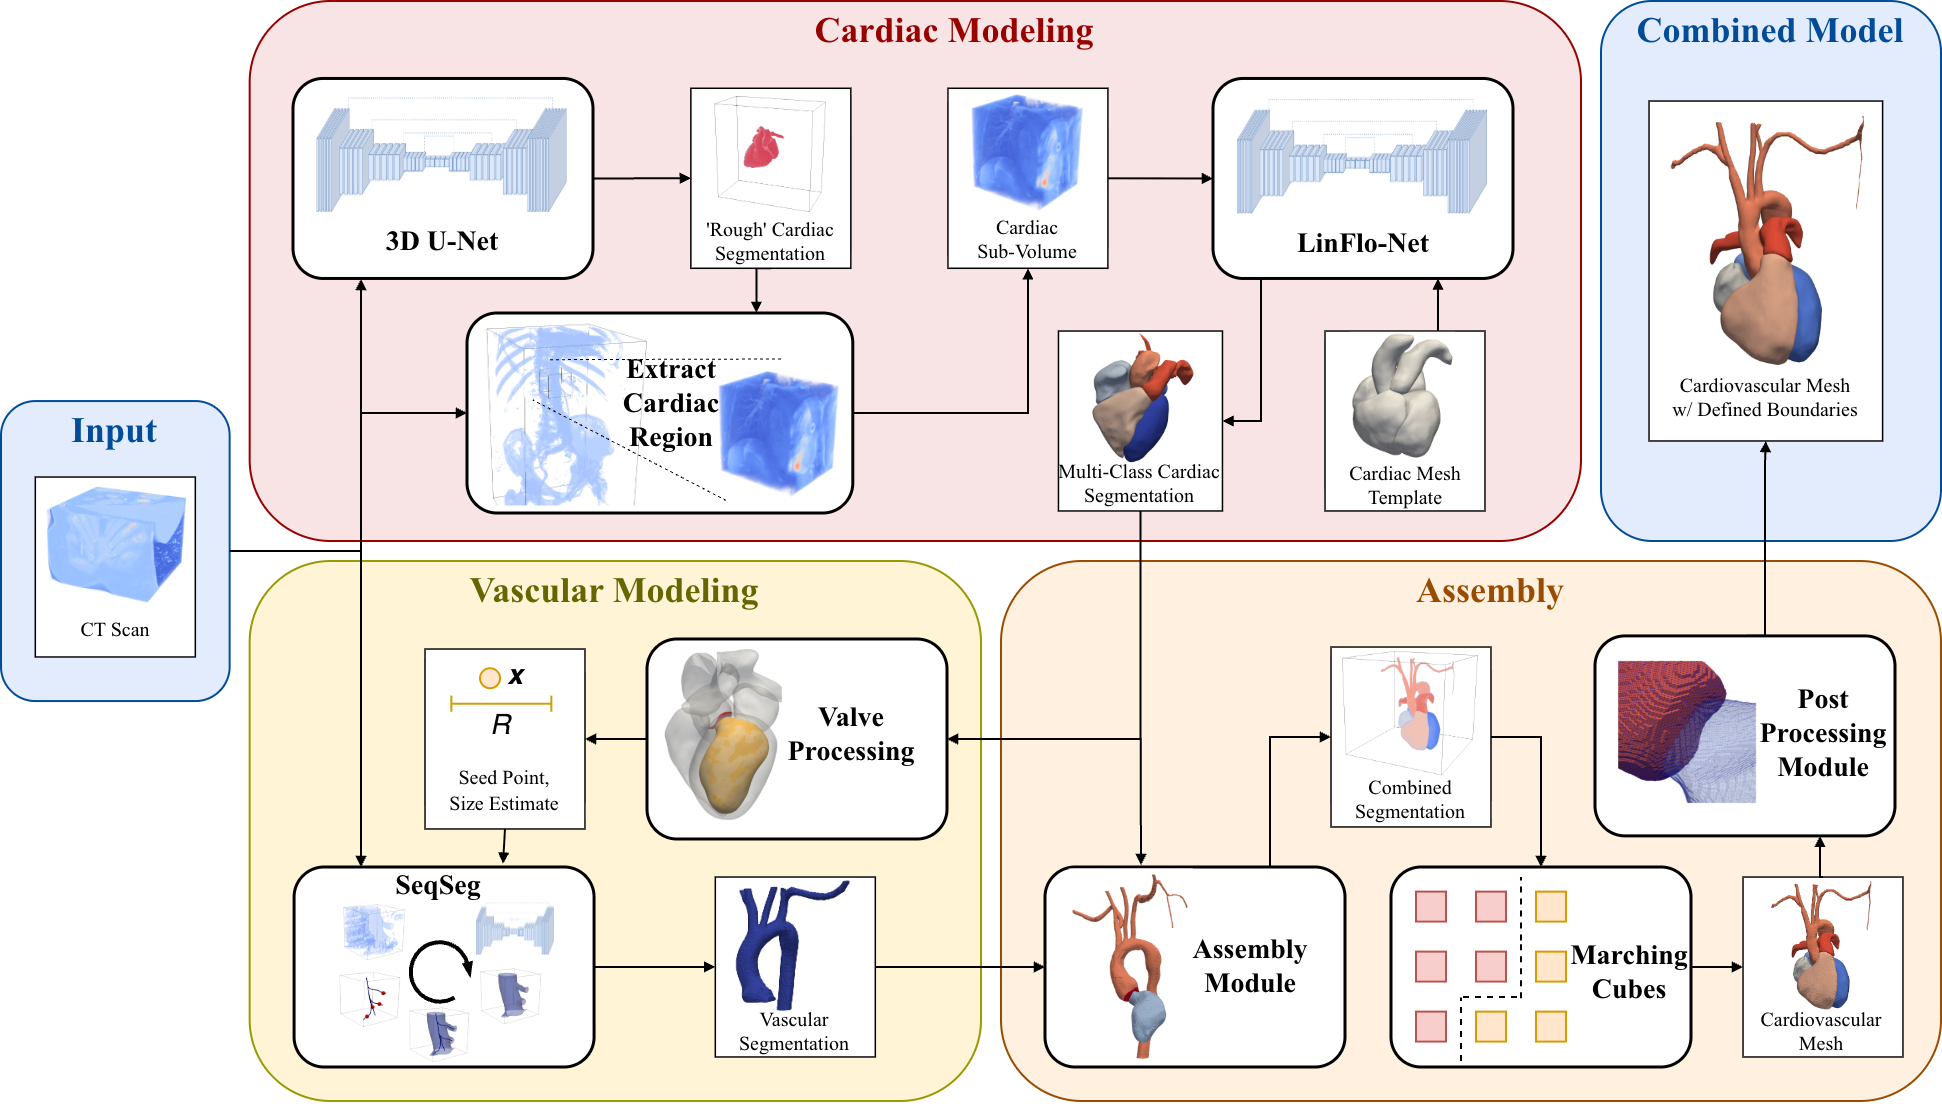
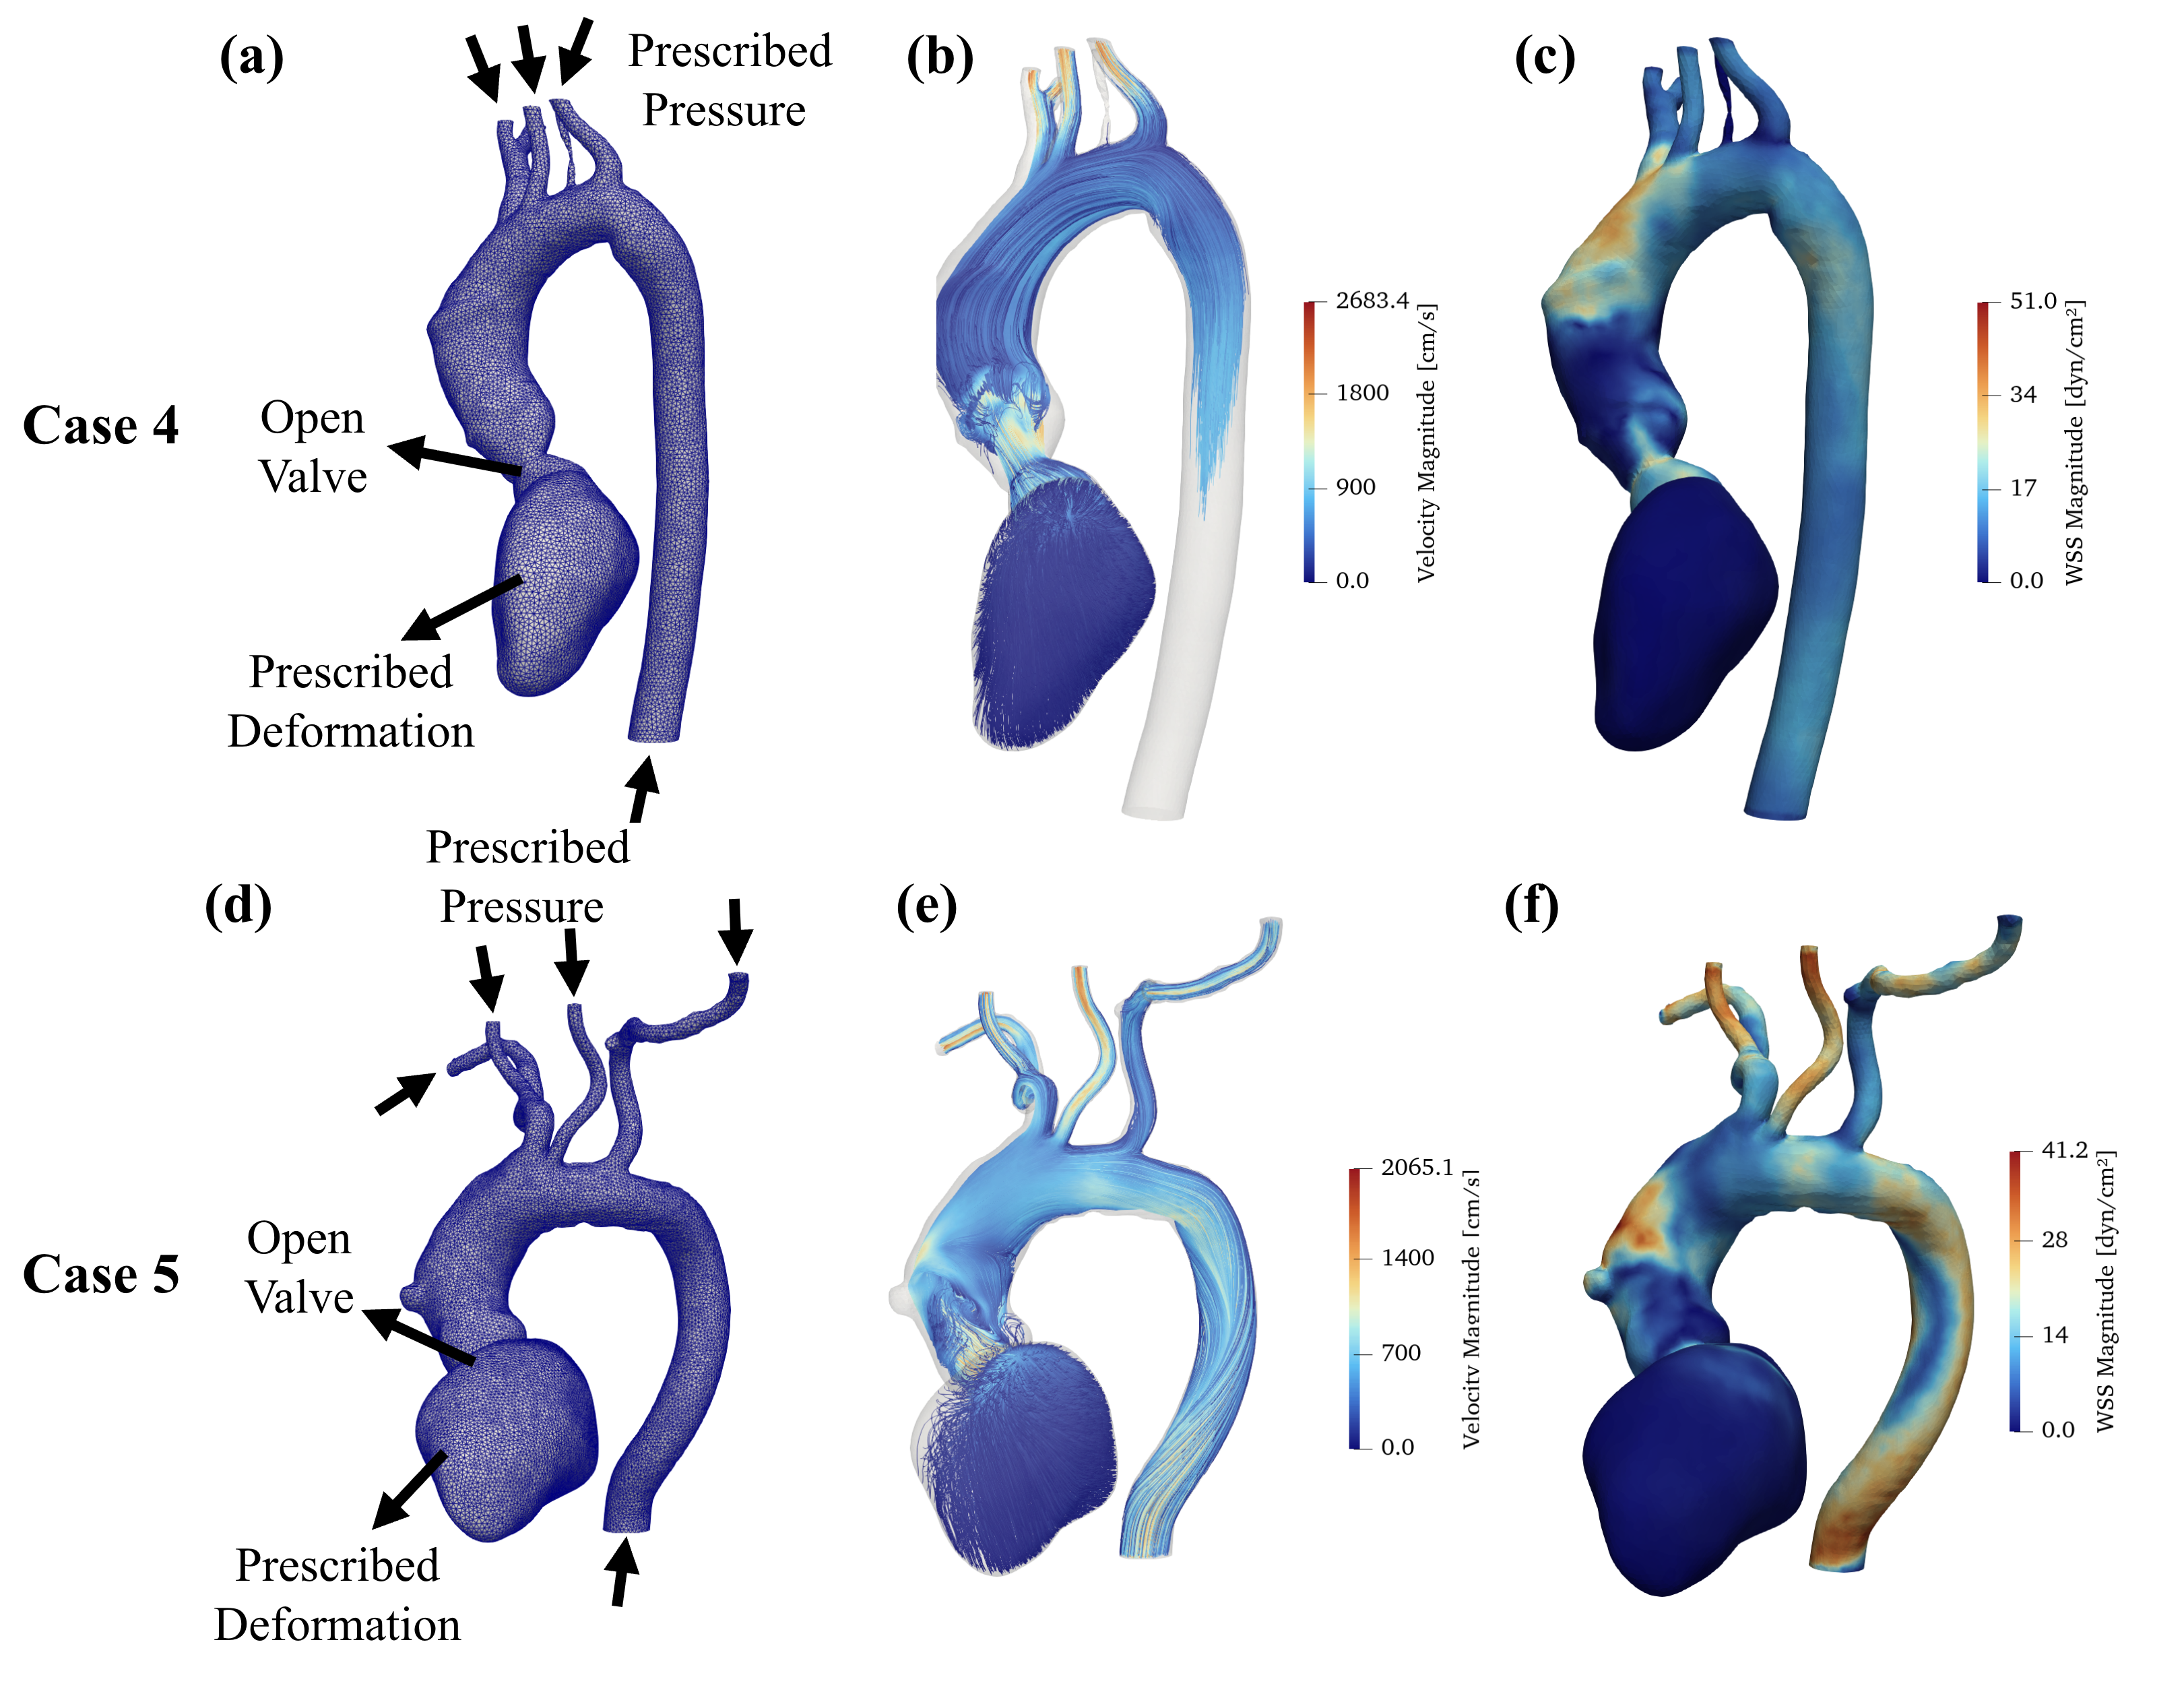
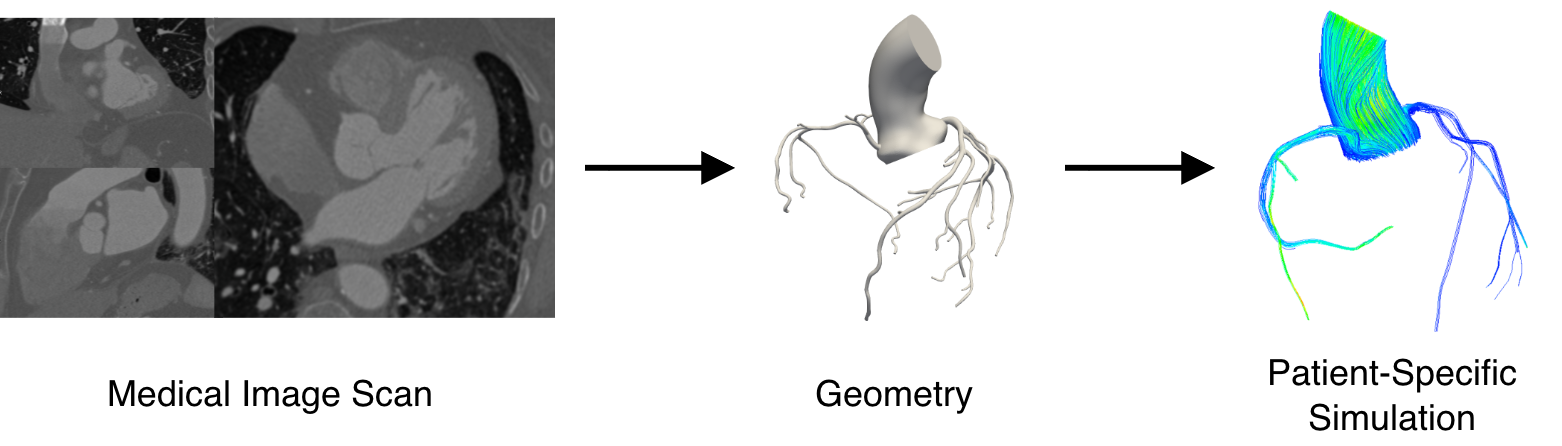
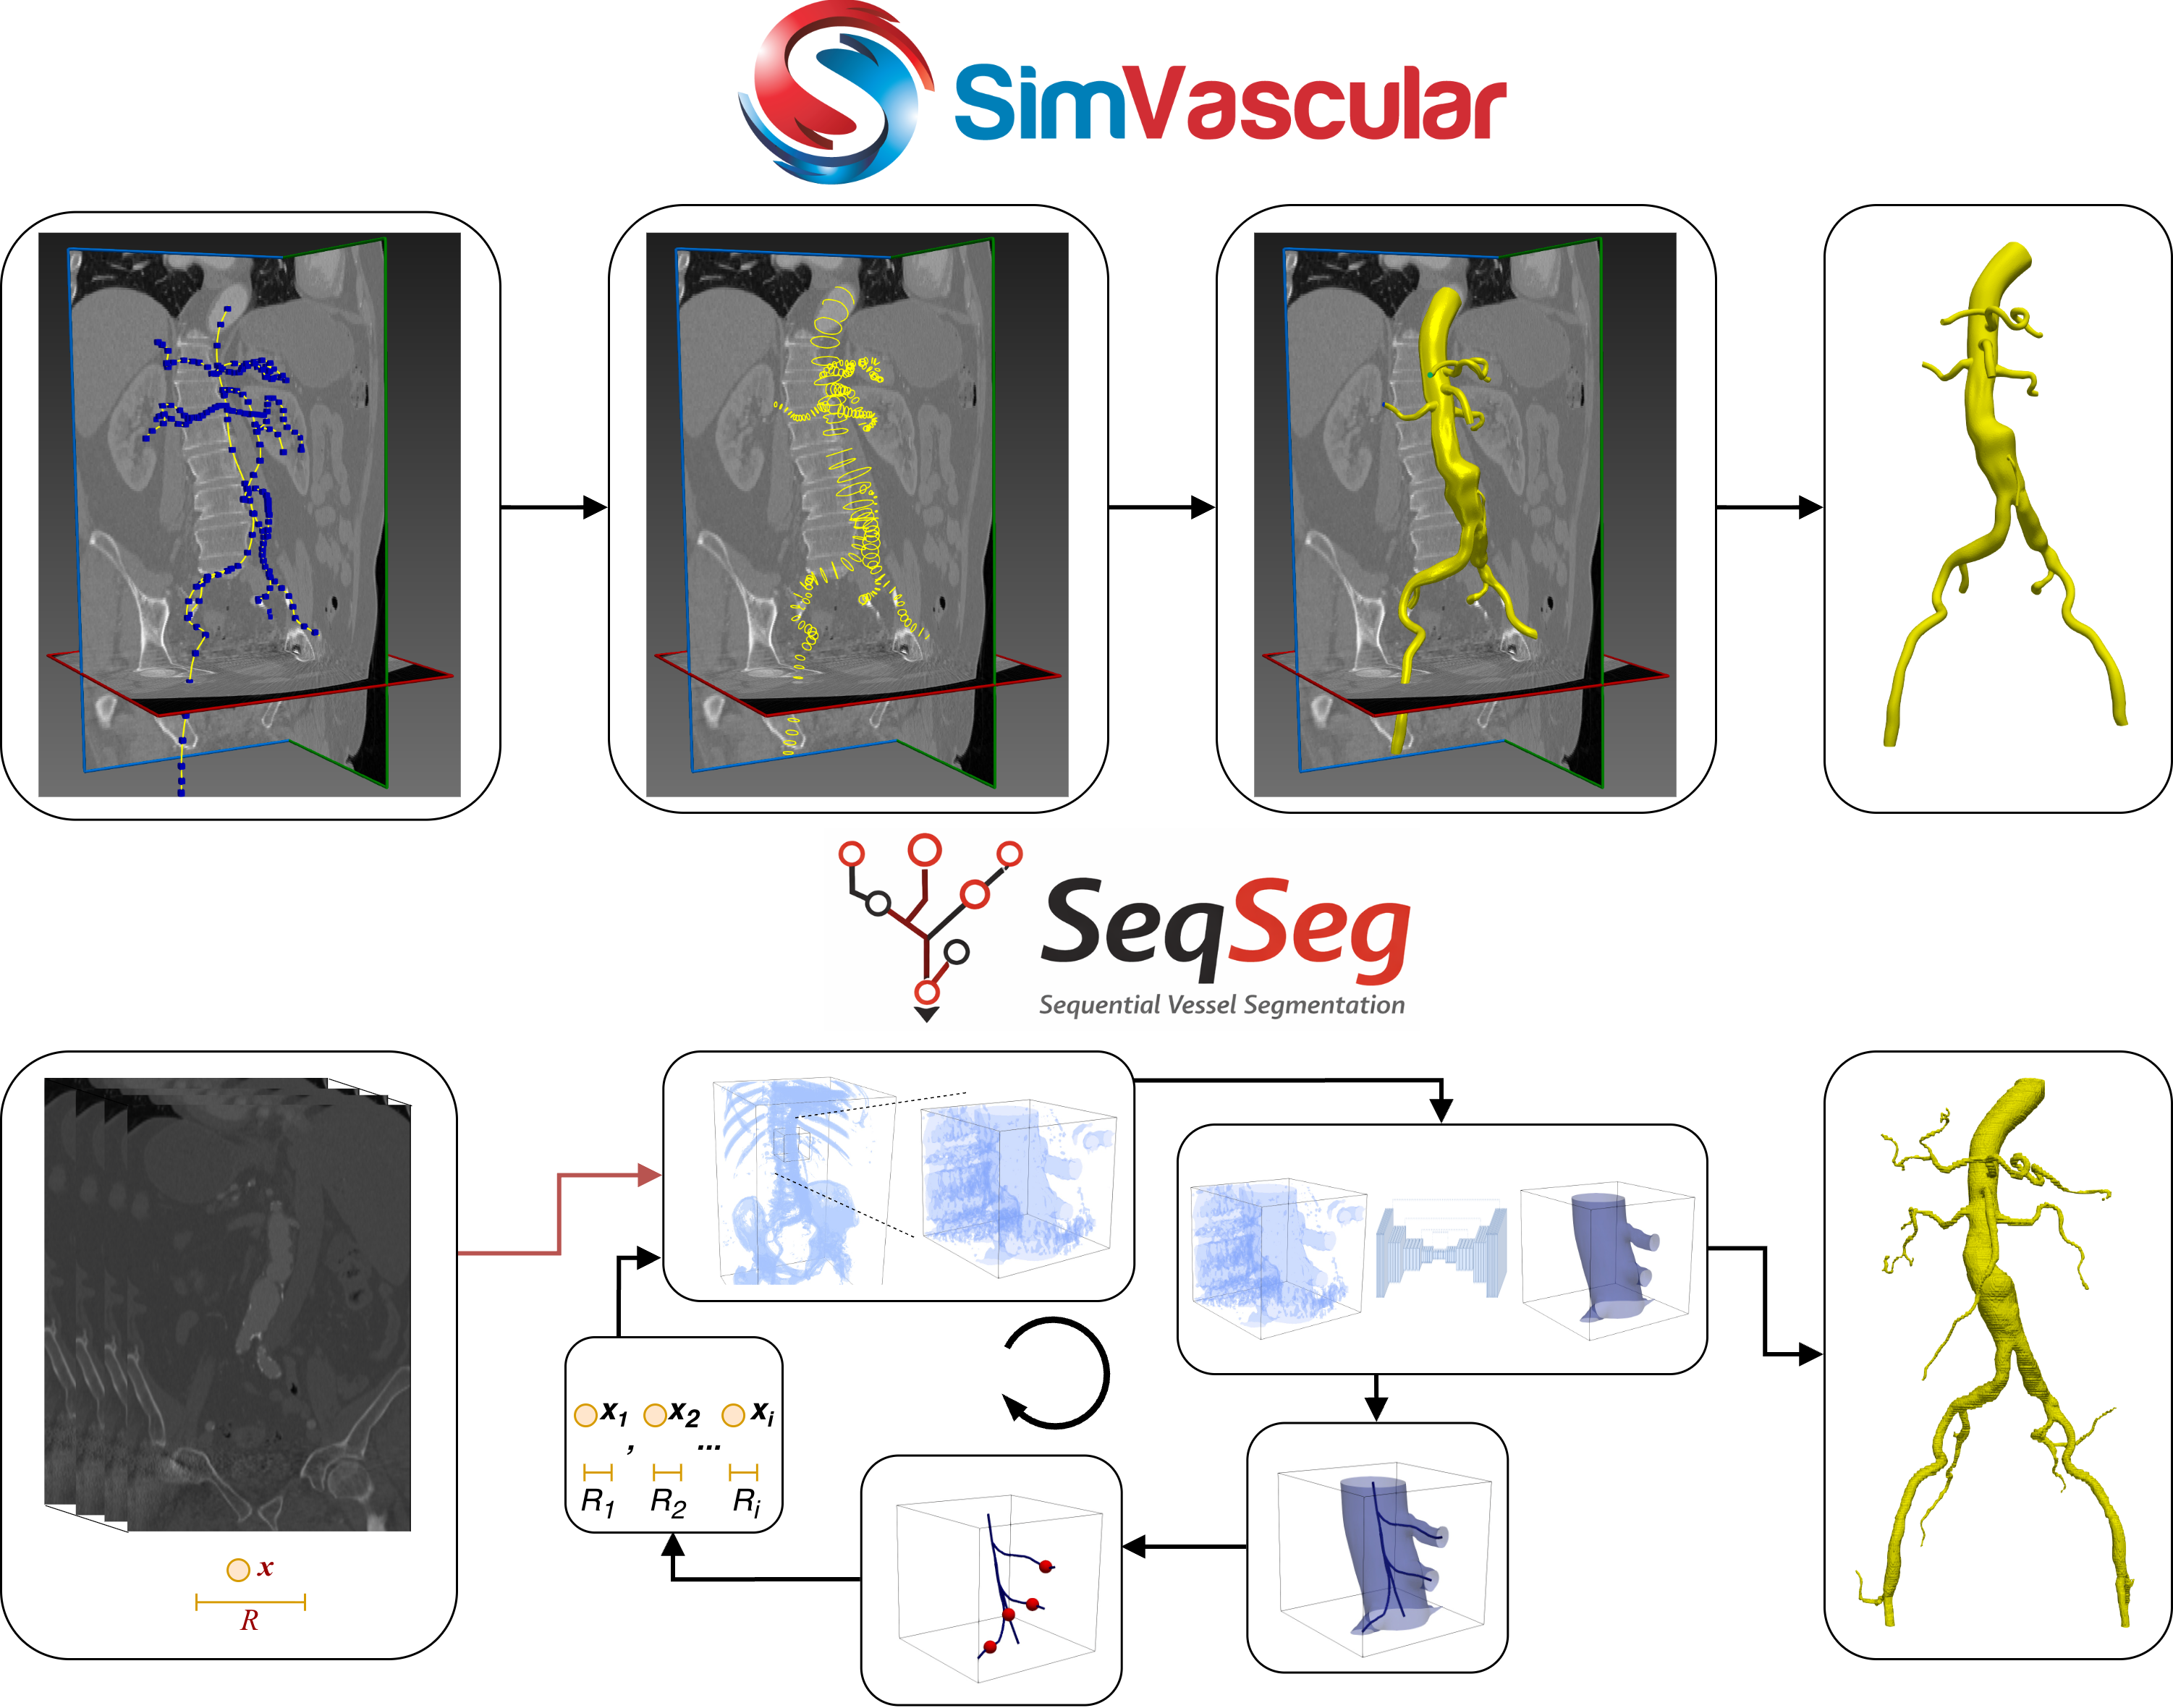
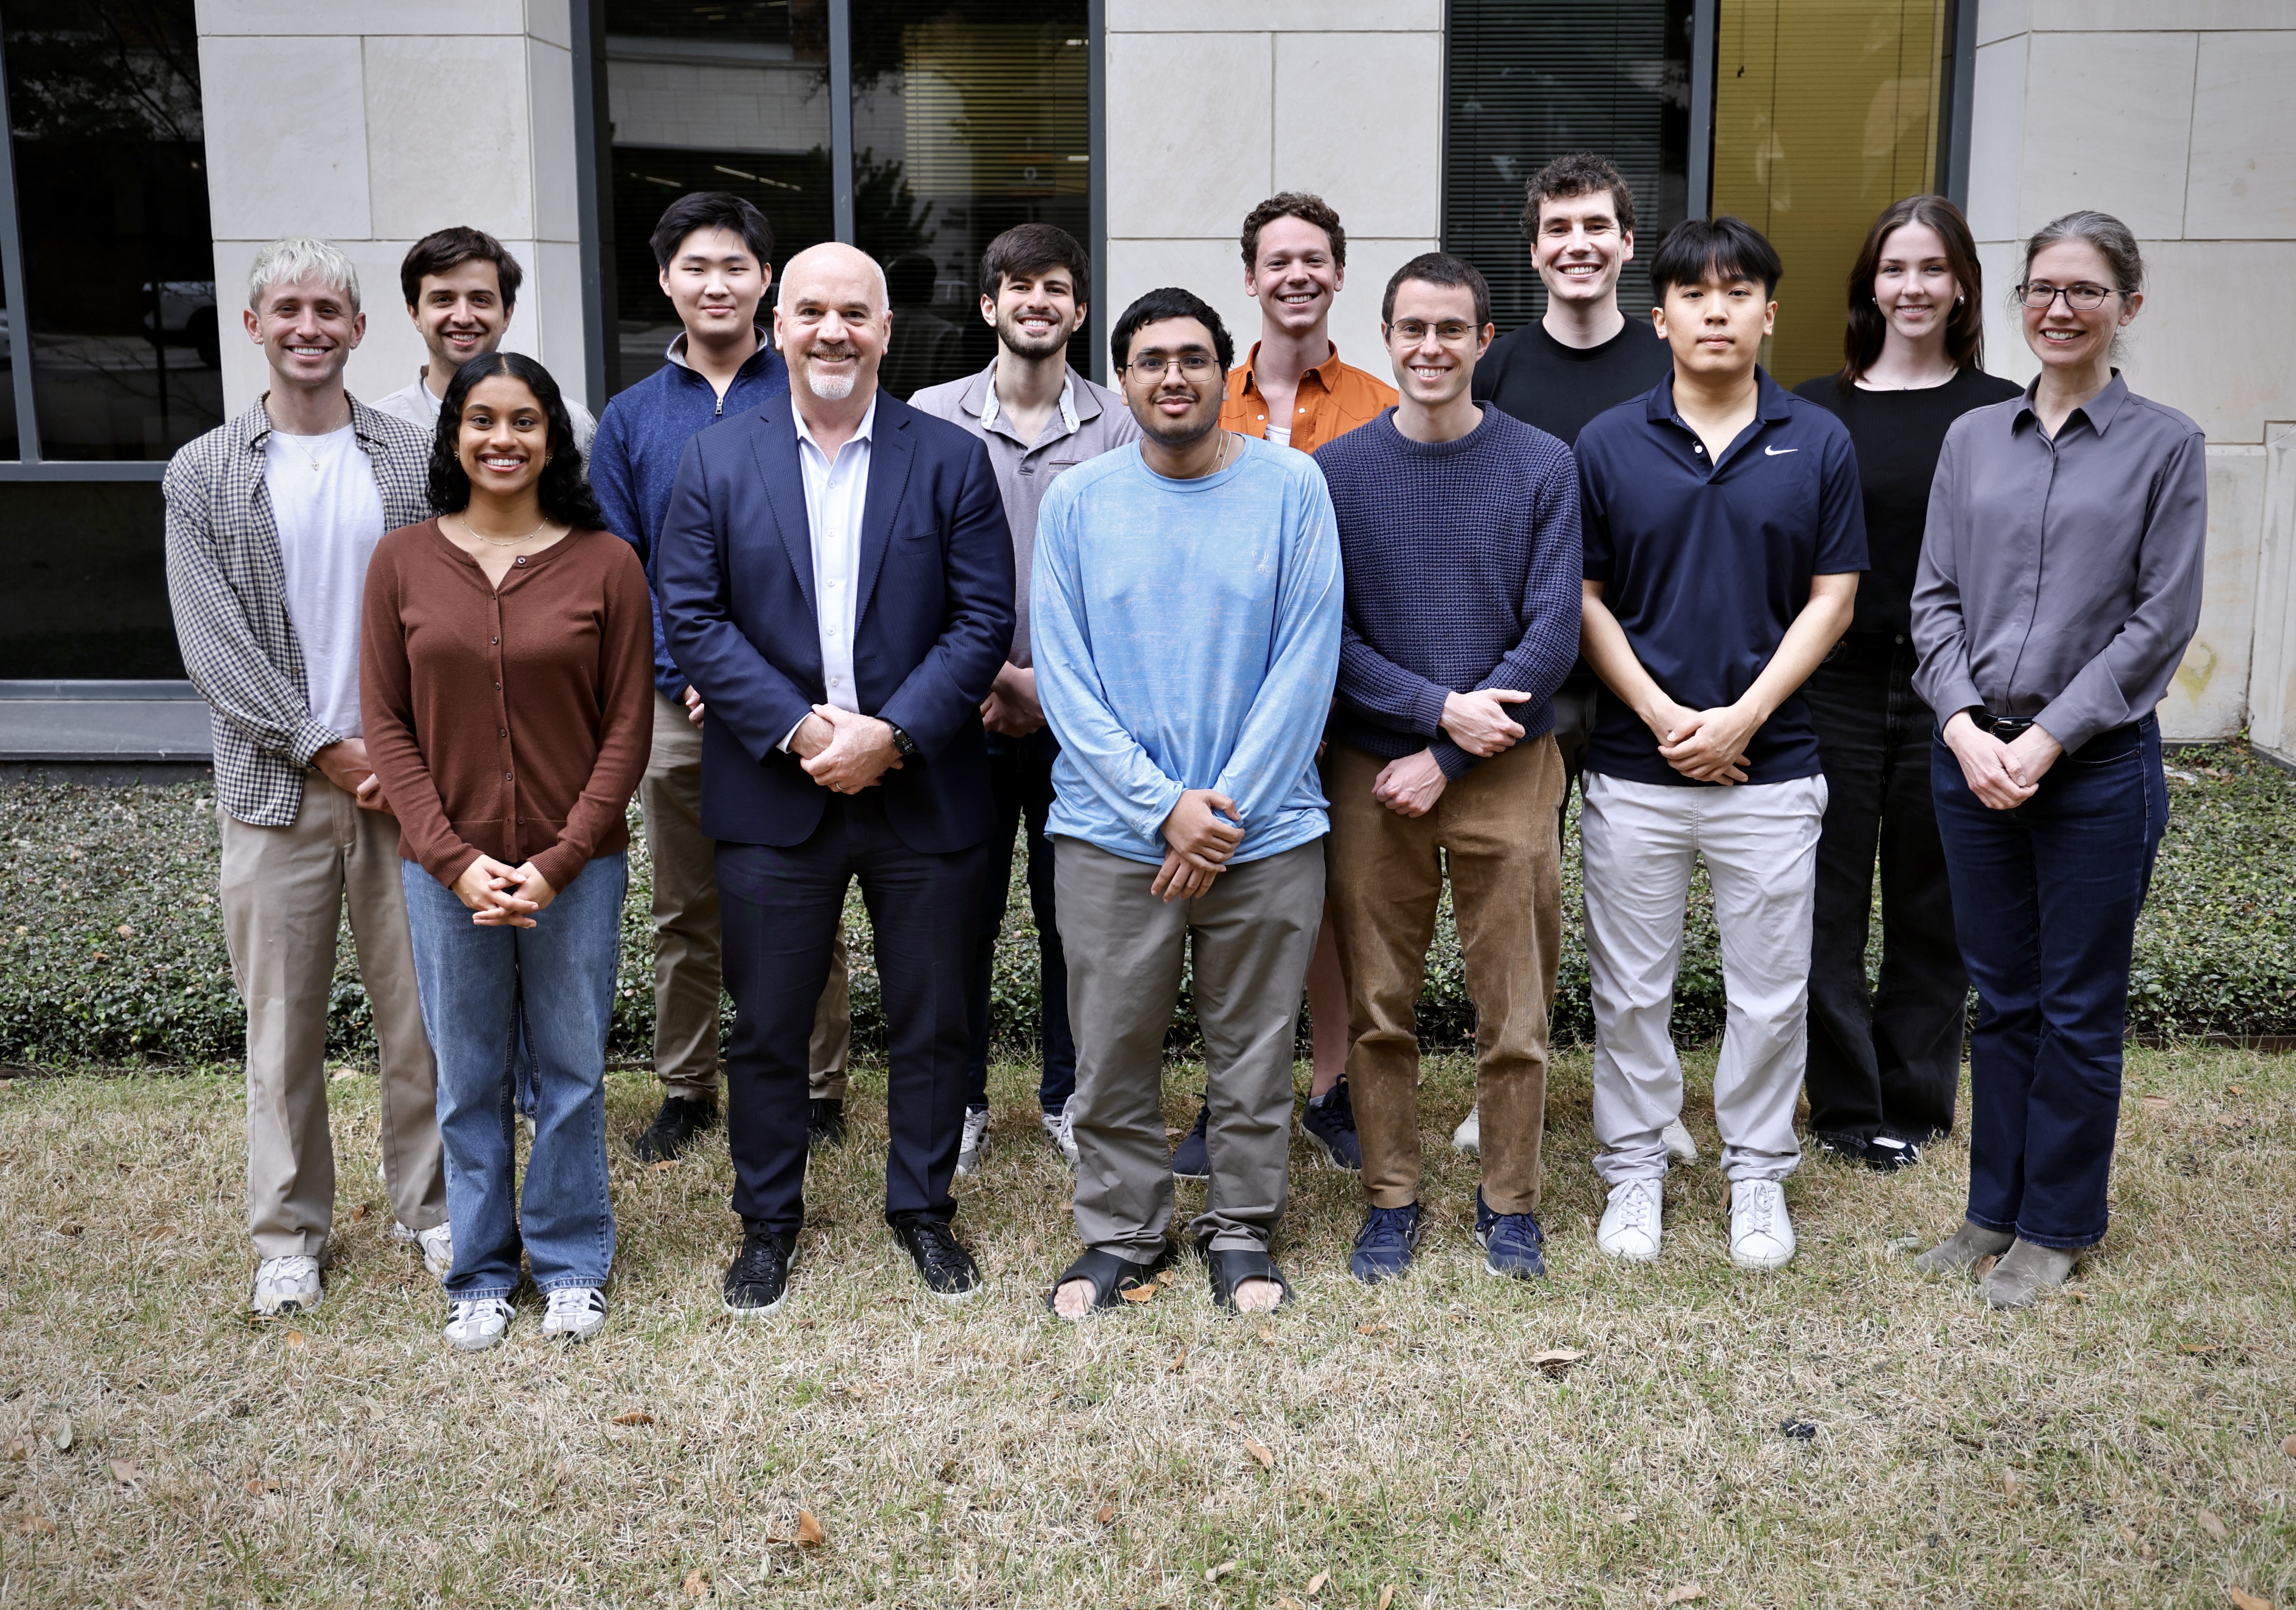
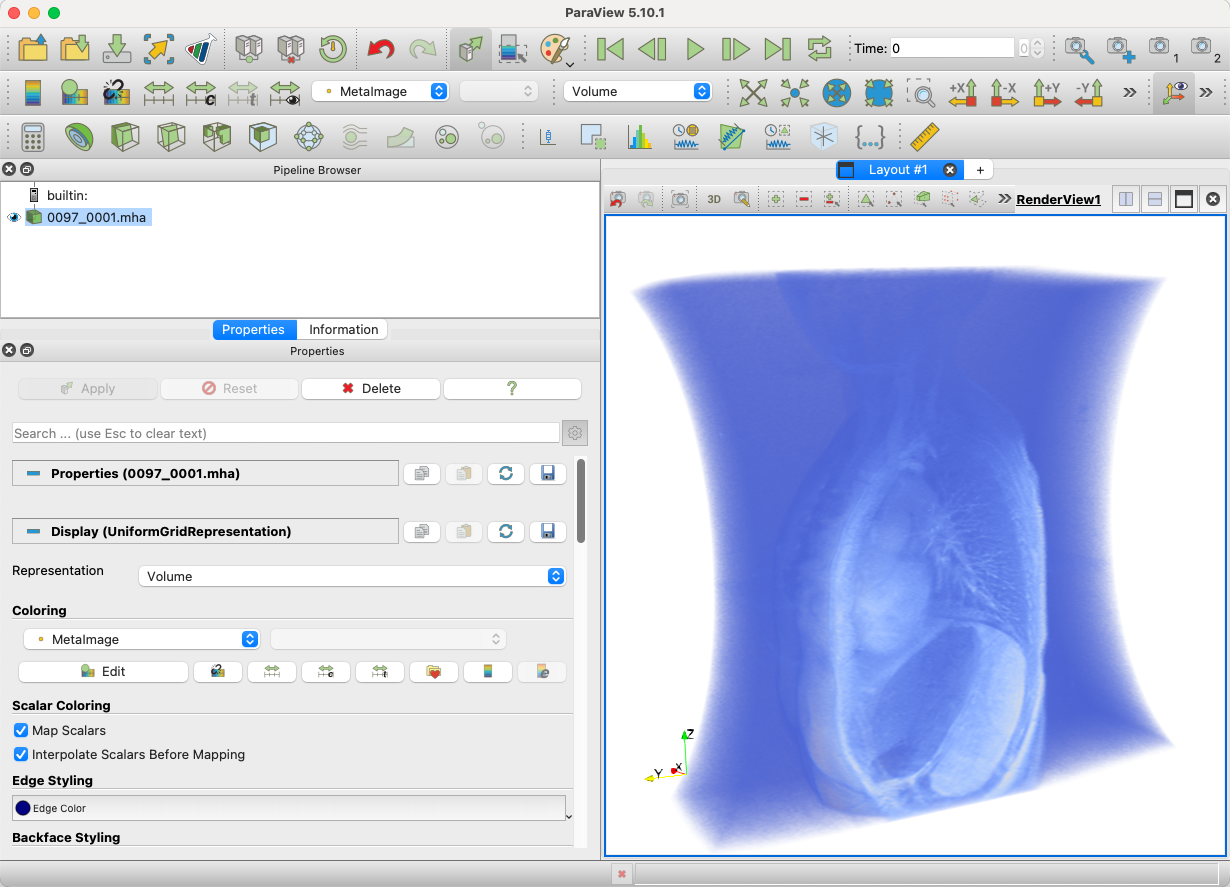
<?xml version="1.0" encoding="utf-8"?><feed xmlns="http://www.w3.org/2005/Atom" xml:lang="en"><generator uri="https://jekyllrb.com/" version="4.4.1">Jekyll</generator><link href="https://numisveinsson.com/feed.xml" rel="self" type="application/atom+xml"/><link href="https://numisveinsson.com/" rel="alternate" type="text/html" hreflang="en"/><updated>2026-11-06T07:50:11+00:00</updated><id>https://numisveinsson.com/feed.xml</id><title type="html">blank</title><subtitle>Personal website of Númi Sveinsson Cepero, a Postdoctoral Fellow at the Oden Institute, UT Austin, working on computational modeling, deep learning, and medical imaging for patient-specific cardiovascular and respiratory simulation. </subtitle><entry><title type="html">One Model, Heart and Vessels: How MeshGrow Builds Simulation-Ready Cardiovascular Anatomy</title><link href="https://numisveinsson.com/blog/2026/meshgrow-heart-and-vessels-one-model/" rel="alternate" type="text/html" title="One Model, Heart and Vessels: How MeshGrow Builds Simulation-Ready Cardiovascular Anatomy"/><published>2026-07-11T00:00:00+00:00</published><updated>2026-07-11T00:00:00+00:00</updated><id>https://numisveinsson.com/blog/2026/meshgrow-heart-and-vessels-one-model</id><content type="html" xml:base="https://numisveinsson.com/blog/2026/meshgrow-heart-and-vessels-one-model/"><![CDATA[<h2 id="the-problem">The Problem</h2> <p>To simulate blood flow through a patient’s cardiovascular system—to plan a procedure, test a device, or study how disease is progressing—you first need an accurate 3D model of that person’s anatomy. And ideally, you want the <em>whole</em> picture: the heart chambers pumping the blood and the arteries carrying it away.</p> <p>The trouble is that building these models from a CT or MR scan is one of the slowest, most manual steps in the entire pipeline. Existing automated methods have mostly picked a side: some are good at reconstructing the <strong>cardiac chambers</strong>, others at tracing the <strong>vasculature</strong>. Very few produce a single, connected, simulation-ready model of both.</p> <p>MeshGrow is our attempt to close that gap.</p> <div class="row justify-content-sm-center"> <div class="col-sm-11 mt-3 mt-md-0"> <figure> <picture> <img src="/assets/img/cardiac_combo.png" class="img-fluid rounded z-depth-1" width="auto" height="auto" alt="Left: a labeled model with colored cardiac chambers and the aorta and its branches. Right: the same anatomy as a single unified gray mesh." title="A combined cardiac and vascular model built by MeshGrow" onerror=" this.onerror = null; $('.responsive-img-srcset').remove(); "/> </picture> </figure> </div> </div> <div class="caption"> A combined cardiovascular model produced by MeshGrow. <strong>Left:</strong> the labeled anatomy—cardiac chambers plus the aorta and its main sub-branches. <strong>Right:</strong> the same structures merged into a single, watertight mesh that is ready for a blood-flow simulation. </div> <h2 id="why-the-heart-and-the-vessels-fight-back">Why the Heart and the Vessels Fight Back</h2> <p>Cardiac chambers and blood vessels look nothing alike, and that is exactly the problem.</p> <ul> <li><strong>The heart chambers</strong> are big, blob-like volumes. Their overall shape is fairly consistent from patient to patient, so a method that “knows” what a heart looks like can deform a template to fit a new scan.</li> <li><strong>The vessels</strong> are thin, branching tubes that vary enormously between people and make up only a tiny fraction of the pixels in a scan. A rigid template can’t anticipate where every branch goes; you have to follow them.</li> </ul> <p>Trying to force one technique to handle both anatomies tends to do neither well. So instead of looking for a single hammer, MeshGrow uses the right tool for each job.</p> <h2 id="the-core-idea-two-tools-for-two-anatomies">The Core Idea: Two Tools for Two Anatomies</h2> <p>MeshGrow is a <strong>two-stage</strong> framework:</p> <ol> <li> <p><strong>Mesh the heart.</strong> For the cardiac chambers, we use a template-based deep learning approach. The method starts from a mesh that already encodes what a healthy heart’s chambers look like, and deforms it to match the patient in the scan. Because the template carries prior knowledge of cardiac anatomy, this stays robust even where image quality is poor.</p> </li> <li> <p><strong>Grow the vessels out from it.</strong> For the aorta and its main sub-branches, we use a step-wise, growth-based tracer (the same family of ideas behind <a href="/blog/2026/blurry-ct-to-simulation-ready-artery/">SeqSeg</a>): starting near the heart, it follows each vessel locally, one small piece at a time, and assembles the branches into a connected tree.</p> </li> </ol> <p>The name says it all—we mesh the heart first, then <em>grow</em> the vasculature outward from it.</p> <div class="row justify-content-sm-center"> <div class="col-sm-12 mt-3 mt-md-0"> <figure> <picture> <img src="/assets/img/meshgrow/fig1_MeshGrow_workflow.png" class="img-fluid rounded z-depth-1" width="auto" height="auto" alt="MeshGrow workflow diagram: a CT scan feeds cardiac modeling (3D U-Net and LinFlo-Net template deformation) and vascular modeling (SeqSeg with valve processing), which are combined in an assembly stage using marching cubes and post-processing to produce a single cardiovascular mesh with defined boundaries." title="The MeshGrow workflow" onerror=" this.onerror = null; $('.responsive-img-srcset').remove(); "/> </picture> </figure> </div> </div> <div class="caption"> The full MeshGrow pipeline. Starting from a single CT scan, the cardiac chambers are meshed by deforming a template (top), the vessels are traced piece by piece with SeqSeg starting from a seed point at the aortic valve (bottom left), and the two are fused in an assembly stage into one cardiovascular mesh with defined boundary surfaces (right). </div> <h2 id="stitching-the-heart-to-the-vessels">Stitching the Heart to the Vessels</h2> <p>Building two halves is only useful if they connect properly. The interesting engineering in MeshGrow is at the seam: the framework joins the cardiac mesh and the vascular mesh into a single watertight surface, and—critically—defines an <strong>aortic valve surface</strong> where the left ventricle meets the aorta.</p> <p>That valve surface, along with the vessel inlets and outlets, is exactly what a solver needs to apply <strong>boundary conditions</strong>: where blood enters, where it leaves, and how the valve gates flow. Without them, you have a pretty picture; with them, you have a computational domain you can actually run physics on.</p> <h2 id="what-we-found">What We Found</h2> <p>We tested MeshGrow on five CT datasets, comparing its output against state-of-the-art benchmark methods and against ground-truth models built by hand.</p> <ul> <li><strong>Higher accuracy.</strong> MeshGrow achieved higher metric scores than the benchmark methods across the test data.</li> <li><strong>It actually simulates.</strong> To prove the models are simulation-ready and not just visually plausible, we ran full three-dimensional computational fluid dynamics (CFD) simulations on two of the test cases—end to end, from image to hemodynamics.</li> <li><strong>One connected model.</strong> By meshing the chambers and growing the vessels with anatomy-specific tools and then fusing them, MeshGrow returns a unified mesh with the valve and boundary surfaces already in place.</li> </ul> <div class="row justify-content-sm-center"> <div class="col-sm-11 mt-3 mt-md-0"> <figure> <picture> <img src="/assets/img/meshgrow/fig5_MeshGrow_sims.png" class="img-fluid rounded z-depth-1" width="auto" height="auto" alt="Computational fluid dynamics results for two cases: the boundary-condition setup with prescribed pressure, open valve, and prescribed deformation; velocity-magnitude streamlines; and wall shear stress magnitude." title="CFD simulations on two MeshGrow models" onerror=" this.onerror = null; $('.responsive-img-srcset').remove(); "/> </picture> </figure> </div> </div> <div class="caption"> Blood-flow simulations run directly on two MeshGrow models. The unified mesh already carries what a solver needs—an open aortic valve, inlet/outlet surfaces, and prescribed wall motion (left)—so we can compute velocity streamlines (middle) and wall shear stress (right) without any extra hand-cleanup. </div> <h2 id="why-this-matters">Why This Matters</h2> <p>Most automated modeling tools force a choice between the heart and the vessels. MeshGrow shows that you don’t have to choose: by matching the method to the anatomy—template deformation for the chambers, growth-based tracing for the vessels—you can automate the construction of a <em>combined</em> cardiovascular model.</p> <p>That is a step toward making patient-specific simulation practical at scale: large-cohort studies and, eventually, time-sensitive clinical settings where waiting hours to hand-build a model isn’t an option.</p> <h2 id="read-the-paper">Read the Paper</h2> <p>MeshGrow is published, open access, in <em>JRSM Cardiovascular Disease</em>:</p> <ul> <li><strong>Paper:</strong> <a href="https://journals.sagepub.com/doi/10.1177/20480040261455944">MeshGrow: Integrated framework for simulation-ready cardiac and vascular mesh construction from medical imaging</a></li> <li><strong>Earlier conference version:</strong> <a href="https://link.springer.com/chapter/10.1007/978-3-031-94562-5_10">Integrated Framework for Unified Cardiac and Vascular Mesh Construction from Medical Images (FIMH 2025)</a></li> <li><strong>Related work:</strong> the vessel-growing idea builds on <a href="/blog/2026/blurry-ct-to-simulation-ready-artery/">SeqSeg</a></li> </ul> <p><em>This work was done with Arjun Narayanan, Fanwei Kong, and Prof. Shawn Shadden. Curious about automated cardiovascular modeling, or have thoughts on where the remaining bottlenecks are? I’d love to hear from you—reach out or leave a comment below.</em></p>]]></content><author><name>Númi Sveinsson Cepero</name></author><category term="research"/><summary type="html"><![CDATA[A plain-language explainer of MeshGrow, an automated framework for constructing combined cardiac and vascular models from medical images]]></summary></entry><entry><title type="html">How Do You Turn a Blurry CT Scan into a Simulation-Ready Artery?</title><link href="https://numisveinsson.com/blog/2026/blurry-ct-to-simulation-ready-artery/" rel="alternate" type="text/html" title="How Do You Turn a Blurry CT Scan into a Simulation-Ready Artery?"/><published>2026-06-19T00:00:00+00:00</published><updated>2026-06-19T00:00:00+00:00</updated><id>https://numisveinsson.com/blog/2026/blurry-ct-to-simulation-ready-artery</id><content type="html" xml:base="https://numisveinsson.com/blog/2026/blurry-ct-to-simulation-ready-artery/"><![CDATA[<h2 id="why-this-is-hard">Why This Is Hard</h2> <p>If you want to simulate blood flow in a <em>specific</em> patient’s arteries—to plan a treatment, test a device, or see how a disease is progressing—you need a 3D model of that person’s vessels first. The simulation itself is hard enough. Getting a usable geometry out of a CT or MR scan is often worse.</p> <p>That middle step, image to model, is still mostly done by hand. It’s slow, expensive, and it doesn’t scale.</p> <div class="row justify-content-sm-center"> <div class="col-sm-12 mt-3 mt-md-0"> <figure> <picture> <img src="/assets/img/ct_2_model_post/p-specific%20computational%20modeling-geometry_input.png" class="img-fluid rounded z-depth-1" width="auto" height="auto" alt="Patient-specific modeling pipeline: a medical image scan is converted into a 3D geometric model and then a blood flow simulation" title="From medical image to patient-specific simulation" onerror=" this.onerror = null; $('.responsive-img-srcset').remove(); "/> </picture> </figure> </div> </div> <div class="caption"> The patient-specific modeling pipeline for a coronary artery model: scan → 3D geometry → blood-flow simulation. SeqSeg is aimed at that middle step. </div> <h2 id="the-manual-workflow">The Manual Workflow</h2> <p>For more than 20 years, the usual path from a CT or MR scan to a simulation-ready vascular model has looked like this:</p> <ol> <li><strong>Trace centerlines</strong> through every vessel you care about—usually by hand.</li> <li><strong>Segment the lumen</strong> (the open channel blood flows through) at many cross-sections along those centerlines.</li> <li><strong>Loft and join</strong> the cross-sections and branches into one connected 3D model.</li> </ol> <p>Each of those steps means a trained person clicking through slices. For a big study, or anything clinical where you need answers soon, that is the bottleneck.</p> <p>During my PhD at UC Berkeley with Prof. Shawn Shadden, I set out to automate as much of this as I could. The method we ended up with is called <strong>SeqSeg</strong> (Sequential Segmentation).</p> <div class="row justify-content-sm-center"> <div class="col-sm-12 mt-3 mt-md-0"> <figure> <picture> <img src="/assets/img/ct_2_model_post/manual_vs_DL_modeling_compare.png" class="img-fluid rounded z-depth-1" width="auto" height="auto" alt="Comparison of the manual SimVascular modeling workflow (top) against the automated SeqSeg workflow (bottom)" title="Manual SimVascular workflow versus automated SeqSeg" onerror=" this.onerror = null; $('.responsive-img-srcset').remove(); "/> </picture> </figure> </div> </div> <div class="caption"> Same model, two workflows. <strong>Top:</strong> the usual SimVascular path—path points, lumen segments, lofting—where each step costs expert time. <strong>Bottom:</strong> SeqSeg, which walks through local subvolumes from a single seed. Because the manual route takes so long, people often stop at the major vessels; automation makes it practical to keep going into smaller branches. </div> <h2 id="looking-locally-instead">Looking Locally Instead</h2> <p>A lot of ML approaches try to segment the whole scan in one shot. That is a tough problem: vessels are a tiny fraction of the voxels, their shape varies a lot between patients, and you still need a connected tree at the end—not a pile of disconnected blobs.</p> <p>SeqSeg does something simpler. It only looks at a small neighborhood at a time and walks along the vessel, roughly the way you’d follow a road without needing the whole map in your head.</p> <p>In practice:</p> <ul> <li>Start from a seed point inside a vessel, plus a rough guess of its size and direction.</li> <li>Crop a small box around that point and run a 3D U-Net on just that subvolume.</li> <li>From the local segmentation, pull a short centerline and estimate where the vessel is headed next.</li> <li>Step forward and repeat.</li> <li>If the vessel forks, put the branch on a queue and come back to it later—usually finishing the larger vessels first.</li> </ul> <p>That is the whole loop. From one click, SeqSeg grows a connected vascular tree. You don’t have to draw centerlines up front; it builds them as it goes, which is often the part that ate the most time in the old workflow.</p> <div class="row justify-content-sm-center"> <div class="col-sm-10 mt-3 mt-md-0"> <video class="img-fluid rounded z-depth-1" autoplay="" loop="" muted="" playsinline="" poster="/assets/img/seqseg_tracing_frame.jpg" aria-label="Animation of SeqSeg automatically tracing and segmenting a vascular model from a medical image"><source src="/assets/video/seqseg_tracing.mp4" type="video/mp4"/></video> </div> </div> <div class="caption"> SeqSeg tracing from a single seed: local segments, one after another, assembled into a full tree. </div> <h2 id="what-actually-worked">What Actually Worked</h2> <p>We tested SeqSeg on CT and MR images of aortic and aortofemoral anatomy and compared it to strong baselines (2D and 3D nnU-Net). A few things stuck with me:</p> <ul> <li> <p><strong>It generalizes better than I expected.</strong> Up close, a vessel looks like a vessel—coronary, aorta, cerebral. Because SeqSeg only ever sees those local neighborhoods, it could segment anatomies it never saw in training. On an independent hospital dataset it hadn’t been trained on, it even picked up branches that were missing from the “ground truth.”</p> </li> <li> <p><strong>It stays connected.</strong> Pixel-wise methods often leave gaps, and a broken lumen is useless for simulation. Building the model step by step keeps the tree together, and the branch history is handy when you need to place inlets and outlets.</p> </li> <li> <p><strong>It’s faster, and it reaches farther.</strong> On the same hardware we saw roughly 20–80 minutes depending on how many branches it chased, versus about 2–3 hours for the benchmark—and SeqSeg usually kept more of the smaller distal branches.</p> </li> </ul> <h2 id="whats-still-rough">What’s Still Rough</h2> <p>I’m not trying to put experts out of a job. I want them to spend less time clicking and more time on the parts that actually need judgment—and I want patient-specific simulation to be something you can do for more than a handful of cases.</p> <p>SeqSeg still has sharp edges. If a bifurcation root is hidden by artifacts, a branch can get dropped. The voxel segmentation can leave staircase noise on the surface. And calling a network at every step gets expensive when the vascular tree is huge. Those are the problems I’ve kept working on since.</p> <h2 id="try-it-yourself">Try It Yourself</h2> <p>SeqSeg is open access in <em>Annals of Biomedical Engineering</em>:</p> <ul> <li><strong>Paper:</strong> <a href="https://link.springer.com/article/10.1007/s10439-024-03611-z">SeqSeg: Learning Local Segments for Automatic Vascular Model Construction</a></li> <li><strong>Code:</strong> <a href="https://github.com/numisveinsson/SeqSeg">github.com/numisveinsson/SeqSeg</a></li> <li><strong>Data:</strong> training and test models from the open <a href="https://vascularmodel.com">Vascular Model Repository</a></li> </ul> <p>If you want a walkthrough of setup, training, and inference, there’s a <a href="/blog/2025/seqseg_setup/">companion tutorial</a> on this blog.</p> <p>Questions or stuck somewhere in the pipeline? Leave a comment below.</p>]]></content><author><name>Númi Sveinsson Cepero</name></author><category term="research"/><summary type="html"><![CDATA[A plain-language explainer of SeqSeg, an automated method for building patient-specific vascular models from medical images]]></summary></entry><entry><title type="html">Surviving Your First Year of Graduate School: Lessons Learned</title><link href="https://numisveinsson.com/blog/2026/surviving-first-year-grad-school/" rel="alternate" type="text/html" title="Surviving Your First Year of Graduate School: Lessons Learned"/><published>2026-01-20T00:00:00+00:00</published><updated>2026-01-20T00:00:00+00:00</updated><id>https://numisveinsson.com/blog/2026/surviving-first-year-grad-school</id><content type="html" xml:base="https://numisveinsson.com/blog/2026/surviving-first-year-grad-school/"><![CDATA[<h2 id="introduction">Introduction</h2> <p>Now that I’ve finished my PhD, the first year looks pretty different than it did while I was living through it. At the time it was exciting and challenging and, honestly, a lot. It was a year of figuring out a new place, a new field, and a new version of myself, and it came with a healthy dose of self-doubt.</p> <p>Here are the things I wish someone had told me going in. None of it is about getting straight A’s or publishing early. It’s mostly about not burning out, building something you can stand on, and playing the long game.</p> <h2 id="think-slow-act-fast">Think Slow, Act Fast</h2> <p>One of the most useful ideas I picked up in grad school comes from <em>How Big Things Get Done</em> by Bent Flyvbjerg and Dan Gardner: “think slow, act fast.” Before you jump into experiments, code, or data, spend real time understanding the landscape of your field first.</p> <p>I used to think of literature search as a box to check before the “real” work. It’s not. It’s one of the most important skills you’ll build. Reading widely keeps you from reinventing the wheel, shows you where the actual gaps are, and slowly gives you a feel for what makes some research matter and other research forgettable.</p> <p>A few things that worked for me:</p> <ul> <li>Start with review papers and recent high-impact work to get the lay of the land, then drill into the specifics.</li> <li>Read with some kind of system. For each paper I’d jot down the problem, the approach, what it couldn’t do, and the questions it left open.</li> <li>Ask your advisor and labmates which papers are actually foundational and which ones you can skip. This saves a ton of time.</li> <li>Don’t try to read everything, because you can’t. Aim to understand the key ideas and roughly where the field stands.</li> </ul> <p>Thinking slow isn’t the same as being slow. It just means being deliberate about where you put your energy before you sprint off in some direction.</p> <h2 id="dont-get-overwhelmed-by-research-progress">Don’t Get Overwhelmed by Research Progress</h2> <p>For most of my first year I felt this nagging pressure to produce. Other students seemed to be off presenting at conferences and putting out papers, and I kept wondering why I wasn’t. Looking back, almost all of that pressure was coming from me.</p> <p>Your first year really isn’t about output. It’s about learning how to think. Use it to poke around different directions before you commit to one, to sit with the big questions in your field, and to build up the skills your research is going to need later anyway.</p> <p>Research is messy and nonlinear. You’ll have weeks where everything clicks and weeks where nothing works, and both are completely normal. Try not to compare your chapter 1 to someone else’s chapter 10. Focus on learning to think like a researcher, getting to know your advisor and labmates, and building habits that’ll actually hold up over the next several years.</p> <h2 id="use-coursework-but-keep-the-big-picture">Use Coursework, but Keep the Big Picture</h2> <p>First-year coursework can feel weirdly disconnected from your research, but it’s doing more than it seems. It builds the theory your work eventually leans on, drags you into areas you didn’t know you’d care about, and sharpens how you think in general.</p> <p>While you’re in it, keep asking how a course connects to what you’re interested in, what skills you’re picking up that’ll transfer, and what new questions it’s opening up. The good courses usually leave you with more questions than they answer.</p> <p>Also, give yourself permission to lean into coursework early. The goal is to do well in your classes while starting to dip into research, not to be amazing at both at the same time. That’s a recipe for stress.</p> <h2 id="prioritize-your-health-and-wellbeing">Prioritize Your Health and Wellbeing</h2> <p>Grad school is a marathon, not a sprint, and your health is the thing that makes the whole rest of it possible. It’s not something to trade away.</p> <ul> <li>Sleep and move. You can’t do good work exhausted, and regular exercise did more for my stress than basically anything else I tried.</li> <li>Actually eat. It’s so easy to skip meals when you’re slammed, but your brain needs the fuel.</li> <li>Take your mental health seriously. Learn to notice when you’re underwater, and use your university’s counseling services. Therapy is a tool, not a sign you’re failing.</li> <li>Set boundaries. Learn to say no, take real weekends, and stop checking email at all hours. Overcommitting is the fastest way I know to burn out.</li> </ul> <p>Taking care of yourself isn’t selfish or a distraction. It’s a prerequisite for doing good work.</p> <h2 id="build-community">Build Community</h2> <p>Grad school can get lonely, especially if you moved somewhere new where you don’t know anyone. Building a community ended up being one of the best things I did.</p> <p>The reasons are pretty simple. You need people who get the ups and downs, a lot of the best ideas come out of casual hallway conversations, and the people around you slowly become both your network and your friends.</p> <p>What helped me:</p> <ul> <li>Show up. Go to the seminars, the socials, the random department gatherings.</li> <li>Don’t wait around for invitations. Be the one who organizes the coffee, the study group, the dinner.</li> <li>Get to know your lab. Some of my closest friendships started a couple of desks away.</li> <li>Build relationships with faculty too. Drop by office hours just to chat, ask about their research, and look for mentors beyond your advisor.</li> </ul> <p>This stuff takes time, so be patient and keep showing up.</p> <h2 id="explore-your-new-home">Explore Your New Home</h2> <p>If you moved for grad school, spend some time getting to know your new city. It’s not a distraction from your work. It’s part of being a person who’s happy enough to do the work.</p> <p>Getting out and exploring helped a lot with homesickness, gave me things to look forward to, and made the whole experience about more than just research. Walk or bike around your neighborhood, find your cafe, get outside, go to local events, take the occasional day trip. A happier, more well-rounded person tends to be a better researcher anyway.</p> <h2 id="dealing-with-impostor-syndrome">Dealing with Impostor Syndrome</h2> <p>Almost everyone in grad school feels like an impostor at some point. Like they don’t belong, aren’t smart enough, or are about to get found out. I definitely did.</p> <p>And it makes sense why. You’re surrounded by brilliant people, the bar is high, research is uncertain by nature, and comparison is way too easy. A few things that helped me deal with it:</p> <ul> <li>Talk about it. Saying it out loud to a friend or a counselor takes away most of its power, and you’ll quickly realize you’re not the only one.</li> <li>Reframe it. “I don’t belong here” can become “I’m here to learn, and that’s the whole point.”</li> <li>Track your own growth. Compare yourself to where you were a year ago, not to everyone around you.</li> <li>Celebrate the small wins, and remember you got admitted for a reason.</li> </ul> <p>The people who look the most put-together are usually struggling too. They’ve just gotten better at hiding it. Feeling like an impostor doesn’t make you one. It mostly means you’re somewhere hard and actually growing.</p> <h2 id="conclusion">Conclusion</h2> <p>The first year is a big transition, and feeling overwhelmed or unsure of what you’re doing is completely normal. If I had to boil down what I learned, it’d be something like this:</p> <ul> <li>Think slow, act fast. Understand your field before you dive in.</li> <li>Don’t chase output too early. The first year is for building a foundation.</li> <li>Use your coursework, but keep the big picture in view.</li> <li>Protect your health. It runs everything else.</li> <li>Build community, and get to know where you live.</li> <li>Expect impostor syndrome, and remember almost everyone has it.</li> </ul> <p>The first year is really where the foundation gets laid, academically, professionally, and personally. Be patient with yourself. You’re probably more capable than you feel right now.</p> <p>Good luck, and try to enjoy the ride.</p> <hr/> <p><em>Have questions or want to share your own experiences? Feel free to reach out or leave a comment below.</em></p>]]></content><author><name>Númi Sveinsson Cepero</name></author><category term="graduate-school"/><summary type="html"><![CDATA[Looking back on my PhD, here is the practical advice I wish someone had given me before my first year—on research, coursework, wellbeing, and community.]]></summary></entry><entry><title type="html">A Guide to Applying for PhD Programs and Choosing an Advisor, Project, and Program</title><link href="https://numisveinsson.com/blog/2026/phd-application-guide/" rel="alternate" type="text/html" title="A Guide to Applying for PhD Programs and Choosing an Advisor, Project, and Program"/><published>2026-01-13T00:00:00+00:00</published><updated>2026-01-13T00:00:00+00:00</updated><id>https://numisveinsson.com/blog/2026/phd-application-guide</id><content type="html" xml:base="https://numisveinsson.com/blog/2026/phd-application-guide/"><![CDATA[<h2 id="introduction">Introduction</h2> <p>Applying for PhD programs is one of the most significant decisions in an academic career. Unlike undergraduate or even master’s applications, PhD applications require careful consideration of multiple factors: the program’s reputation, the advisor’s research style and mentorship approach, the specific research project, and how all these elements align with your long-term career goals.</p> <p><strong>Two pieces of advice that cannot be emphasized enough</strong>: First, finding the right advisor is more important than finding the “best” program. Second, talking to current and former students is the single most valuable thing you can do to evaluate a potential advisor and program. No amount of reading websites, papers, or even meeting with the advisor can replace honest conversations with people who have actually lived the experience.</p> <p>This guide draws from my own experience and conversations with peers who have navigated this process. I hope it provides practical insights to help you make informed decisions during your PhD application journey.</p> <h2 id="choosing-a-phd-program">Choosing a PhD Program</h2> <h3 id="program-reputation-and-resources">Program Reputation and Resources</h3> <p>The reputation of a PhD program matters, but it’s not everything. Consider:</p> <ul> <li><strong>Research output</strong>: Look at recent publications from faculty and students. Are they publishing in top-tier venues in your field?</li> <li><strong>Funding</strong>: Does the program guarantee funding? What’s the typical funding package? How long does funding last?</li> <li><strong>Resources</strong>: What facilities, equipment, and computational resources are available? Are there opportunities for collaboration?</li> <li><strong>Placement</strong>: Where do graduates end up? Academia, industry, or other sectors? This can indicate how well the program prepares students for their career goals.</li> </ul> <h3 id="department-culture-and-fit">Department Culture and Fit</h3> <p>The culture of a department can significantly impact your PhD experience:</p> <ul> <li><strong>Collaboration vs. Competition</strong>: Is the environment collaborative or competitive? Which do you thrive in?</li> <li><strong>Work-life balance</strong>: Talk to current students about typical work hours and expectations. Some programs have healthier cultures than others.</li> <li><strong>Diversity and inclusion</strong>: Consider the diversity of faculty and students. Do you see yourself fitting in and being supported?</li> <li><strong>Location</strong>: While not the most important factor, location matters. Consider cost of living, proximity to family, and quality of life.</li> </ul> <h3 id="program-structure">Program Structure</h3> <p>Different programs have different structures:</p> <ul> <li><strong>Coursework requirements</strong>: How many courses are required? Do they align with your interests?</li> <li><strong>Qualifying exams</strong>: What’s the format? How stressful is the process?</li> <li><strong>Thesis timeline</strong>: What’s the typical time to degree? Is there flexibility?</li> <li><strong>Teaching requirements</strong>: Are you required to teach? How much? Is this something you want to do?</li> </ul> <h2 id="choosing-an-advisor">Choosing an Advisor</h2> <p><strong>The advisor-student relationship is the single most important factor in your PhD experience.</strong> While program reputation, location, and resources matter, your advisor will shape your daily life, research trajectory, career development, and overall well-being for the next 4-6 years. A great advisor at a good program is almost always better than a poor advisor at a top program. This cannot be overstated.</p> <p>The best way to evaluate a potential advisor? <strong>Talk to their current and former students.</strong> They will give you the most honest, unfiltered perspective on what it’s really like to work with that advisor. Here’s what to consider:</p> <h3 id="research-alignment">Research Alignment</h3> <ul> <li><strong>Research interests</strong>: Do the advisor’s research interests genuinely align with yours? Read their recent papers and see if you’re excited about the work.</li> <li><strong>Research style</strong>: Are they theoretical, experimental, computational, or a mix? Does this match your preferred approach?</li> <li><strong>Research trajectory</strong>: Where is their research heading? Is it a growing field or one that’s becoming saturated?</li> </ul> <h3 id="mentorship-style">Mentorship Style</h3> <p>Different advisors have different mentorship styles:</p> <ul> <li><strong>Hands-on vs. hands-off</strong>: Do you want frequent meetings and guidance, or more independence? Which style helps you thrive?</li> <li><strong>Communication</strong>: How responsive are they to emails? How do they provide feedback?</li> <li><strong>Expectations</strong>: What are their expectations for work hours, publications, and progress? Are these reasonable and aligned with your goals?</li> </ul> <h3 id="lab-culture">Lab Culture</h3> <p><strong>This is where talking to current and former students becomes absolutely critical.</strong> You cannot fully understand lab culture from a website or a single meeting with the advisor. Here’s what to investigate:</p> <ul> <li><strong>Lab size</strong>: Do you prefer a large lab with many collaborators or a smaller, more intimate group?</li> <li><strong>Lab dynamics</strong>: <strong>Talk to current and former students directly.</strong> Ask them: What’s the lab culture really like? Is it supportive? Do people help each other? Is there competition or collaboration?</li> <li><strong>Collaboration</strong>: Do lab members collaborate with each other, or is it more individual work?</li> <li><strong>Diversity</strong>: Is the lab diverse? Do you see yourself fitting in?</li> <li><strong>Work environment</strong>: Ask students about typical work hours, work-life balance, and whether the advisor respects boundaries</li> <li><strong>Conflict resolution</strong>: How are conflicts handled? What happens when things go wrong?</li> </ul> <p><strong>Questions to ask current/former students:</strong></p> <ul> <li>“What’s the best thing about working with [advisor name]?”</li> <li>“What’s the most challenging aspect?”</li> <li>“How often do you meet with the advisor? What are those meetings like?”</li> <li>“How does the advisor handle setbacks or failed experiments?”</li> <li>“Would you choose this advisor again if you could go back?”</li> <li>“How do students in this lab typically perform? Do they graduate on time?”</li> </ul> <h3 id="career-support">Career Support</h3> <ul> <li><strong>Networking</strong>: Does the advisor help students build their network? Do they introduce students to collaborators and potential employers?</li> <li><strong>Publication strategy</strong>: How do they approach publications? Do students get first authorship opportunities?</li> <li><strong>Career guidance</strong>: Do they support both academic and industry career paths, or do they focus on one?</li> </ul> <h3 id="red-flags-to-watch-for">Red Flags to Watch For</h3> <p><strong>When talking to current and former students, watch for these warning signs:</strong></p> <ul> <li><strong>Students who seem unhappy or stressed</strong>: If multiple students seem consistently stressed or unhappy, that’s a red flag</li> <li><strong>High turnover</strong>: Are students leaving early or switching advisors? This often indicates deeper problems</li> <li><strong>Advisors who are difficult to reach or unresponsive</strong>: If students consistently say the advisor is hard to reach, take note</li> <li><strong>Lack of recent publications or funding</strong>: This could indicate the advisor is struggling or losing interest</li> <li><strong>Negative reviews from former students</strong>: One negative review might be personal, but multiple negative reviews with similar themes is a serious red flag</li> <li><strong>Students who are hesitant to talk</strong>: If students seem reluctant to discuss their experience or give vague answers, that’s concerning</li> <li><strong>Inconsistent stories</strong>: If the advisor tells you one thing but students tell you another, trust the students</li> </ul> <p><strong>Remember</strong>: Current students may be cautious about being completely honest, especially if you’re visiting. Former students (especially those who have graduated) are often the most candid. Reach out to them via email or LinkedIn.</p> <h2 id="choosing-a-research-project">Choosing a Research Project</h2> <h3 id="project-scope-and-feasibility">Project Scope and Feasibility</h3> <ul> <li><strong>Scope</strong>: Is the project well-defined but flexible enough to evolve? Avoid projects that are too narrow or too broad.</li> <li><strong>Feasibility</strong>: Is the project realistic given the timeline and resources? Talk to the advisor about potential challenges.</li> <li><strong>Novelty</strong>: Is the project addressing an important question? Will it lead to meaningful contributions?</li> </ul> <h3 id="your-interest-and-skills">Your Interest and Skills</h3> <ul> <li><strong>Personal interest</strong>: Are you genuinely excited about the project? You’ll be working on it for 4-6 years.</li> <li><strong>Skill development</strong>: Will the project help you develop the skills you want? Consider both technical and soft skills.</li> <li><strong>Career alignment</strong>: Does the project align with your long-term career goals?</li> </ul> <h3 id="project-resources-and-support">Project Resources and Support</h3> <ul> <li><strong>Funding</strong>: Is the project funded? For how long?</li> <li><strong>Equipment and data</strong>: Do you have access to the necessary equipment, data, or computational resources?</li> <li><strong>Collaborations</strong>: Are there opportunities for collaboration with other labs or institutions?</li> </ul> <h2 id="the-application-process">The Application Process</h2> <h3 id="preparing-your-application">Preparing Your Application</h3> <p><strong>Statement of Purpose (SOP)</strong>:</p> <ul> <li>Clearly articulate your research interests and how they align with the program and specific faculty</li> <li>Mention specific professors you’d like to work with and why</li> <li>Discuss your relevant experience and how it prepares you for PhD research</li> <li>Be specific and genuine—avoid generic statements</li> </ul> <p><strong>Letters of Recommendation</strong>:</p> <ul> <li>Choose recommenders who know you well and can speak to your research potential</li> <li>Provide them with your CV, SOP, and information about the programs you’re applying to</li> <li>Give them plenty of time (at least a month)</li> </ul> <p><strong>CV/Resume</strong>:</p> <ul> <li>Highlight research experience, publications, presentations, and relevant coursework</li> <li>Include technical skills and any relevant projects</li> <li>Keep it concise and well-formatted</li> </ul> <p><strong>Transcripts and Test Scores</strong>:</p> <ul> <li>Most programs require GRE scores (though this is changing), and some require subject tests</li> <li>Check each program’s requirements carefully</li> <li>Strong grades in relevant courses matter, but research experience often matters more</li> </ul> <h3 id="reaching-out-to-potential-advisors">Reaching Out to Potential Advisors</h3> <p>Before or after applying, consider reaching out to potential advisors:</p> <ul> <li><strong>Email etiquette</strong>: Write a concise, professional email introducing yourself, expressing interest in their research, and asking if they’re taking students</li> <li><strong>Timing</strong>: Early fall (September-October) is typically a good time, before application deadlines</li> <li><strong>Be specific</strong>: Mention specific papers or projects of theirs that interest you</li> <li><strong>Don’t be discouraged</strong>: Many professors are busy and may not respond. This doesn’t necessarily mean they’re not interested.</li> </ul> <h3 id="interviews-and-visits">Interviews and Visits</h3> <p>If you’re invited for interviews or visits:</p> <ul> <li><strong>Prepare questions</strong>: Ask about research projects, lab culture, funding, expectations, and career outcomes</li> <li><strong>Talk to students—this is non-negotiable</strong>: <strong>Make talking to current and former students a top priority.</strong> Current students are your best source of honest information about day-to-day life in the lab. Try to talk to them one-on-one, away from the advisor if possible. Ask to speak with former students who have graduated—they often provide the most candid feedback.</li> <li><strong>Be yourself</strong>: The visit is also for you to assess fit, not just for them to evaluate you</li> <li><strong>Take notes</strong>: You’ll be meeting many people and it’s easy to forget details</li> <li><strong>Trust your instincts</strong>: If something feels off when talking to students, or if they seem uncomfortable, pay attention to that</li> </ul> <p><strong>Pro tip</strong>: If you can’t visit in person, ask to schedule video calls with current students. Most are happy to talk, and you’ll get valuable insights that you can’t get from the advisor alone.</p> <h2 id="making-the-final-decision">Making the Final Decision</h2> <p>Once you receive offers, consider:</p> <h3 id="compare-your-options">Compare Your Options</h3> <p>Create a comparison matrix considering:</p> <ul> <li>Program reputation and resources</li> <li>Advisor fit and mentorship style</li> <li>Research project interest and feasibility</li> <li>Funding package</li> <li>Location and quality of life</li> <li>Career outcomes of graduates</li> </ul> <h3 id="trust-your-gut">Trust Your Gut</h3> <p>After gathering all the information, trust your instincts. Which program and advisor do you feel most excited about? Where do you see yourself thriving?</p> <h3 id="negotiate-when-appropriate">Negotiate (When Appropriate)</h3> <ul> <li>If you have multiple offers, you may be able to negotiate funding or other terms</li> <li>Be respectful and professional in any negotiations</li> <li>Remember that some things (like guaranteed funding) may be non-negotiable</li> </ul> <h2 id="conclusion">Conclusion</h2> <p>Choosing a PhD program, advisor, and project is a deeply personal decision that will shape the next several years of your life and your career trajectory. There’s no one-size-fits-all answer, and what works for one person may not work for another.</p> <p><strong>Before I wrap up, let me reiterate the two most important takeaways:</strong></p> <ol> <li> <p><strong>Your advisor matters more than almost anything else.</strong> A supportive, well-matched advisor can make a good program great, while a poor advisor can make even the best program miserable. Prioritize finding the right advisor over chasing program rankings.</p> </li> <li> <p><strong>Talk to current and former students—extensively.</strong> They are your most valuable resource. They will tell you things that advisors won’t, websites can’t, and you need to know. Don’t skip this step. Reach out via email, LinkedIn, or during visits. Most students are happy to share their experiences, and their insights are irreplaceable.</p> </li> </ol> <p>The key is to gather as much information as possible, talk to current and former students, visit if you can, and trust your judgment about fit. Remember that the “best” program on paper isn’t necessarily the best program for you—fit matters enormously.</p> <p>Finally, remember that your PhD is a journey, and your interests and goals may evolve. Choose an advisor and program that offer flexibility and support for growth. Good luck with your applications!</p> <hr/> <p><em>Have questions or want to share your own experience? Feel free to reach out or leave a comment below.</em></p>]]></content><author><name>Númi Sveinsson Cepero</name></author><category term="graduate-school"/><summary type="html"><![CDATA[Practical advice on navigating the PhD application process, from selecting programs to choosing advisors and research projects]]></summary></entry><entry><title type="html">Joining the Predictive Modeling in Medicine Lab (PMML) at UT Austin</title><link href="https://numisveinsson.com/blog/2026/joining-pmml-taylor-lab/" rel="alternate" type="text/html" title="Joining the Predictive Modeling in Medicine Lab (PMML) at UT Austin"/><published>2025-10-25T00:00:00+00:00</published><updated>2025-10-25T00:00:00+00:00</updated><id>https://numisveinsson.com/blog/2026/joining-pmml-taylor-lab</id><content type="html" xml:base="https://numisveinsson.com/blog/2026/joining-pmml-taylor-lab/"><![CDATA[<h2 id="a-new-chapter">A New Chapter</h2> <p>On October 25th 2025, I joined the <strong>Predictive Modeling in Medicine Lab (PMML)</strong>, led by Prof. Charley Taylor, as a <a href="https://oden.utexas.edu/people/directory/numi-cepero-2465/">postdoctoral researcher</a> at the Oden Institute for Computational Engineering and Sciences, with an affiliation at the Texas Advanced Computing Center (TACC). It is an exciting next step that builds directly on my PhD work on patient-specific vascular modeling, and I could not be more thrilled to be part of this group.</p> <div class="row justify-content-sm-center"> <div class="col-sm-12 mt-3 mt-md-0"> <figure> <picture> <img src="/assets/img/lab_photo/Center_for_Comp_Med_Spring_2026-3.JPG" class="img-fluid rounded z-depth-1" width="auto" height="auto" alt="The Predictive Modeling in Medicine Lab (PMML) group photo at UT Austin" title="The Predictive Modeling in Medicine Lab (PMML)" onerror=" this.onerror = null; $('.responsive-img-srcset').remove(); "/> </picture> </figure> </div> </div> <div class="caption"> The Predictive Modeling in Medicine Lab (PMML), part of the Center for Computational Medicine at UT Austin. </div> <h2 id="the-lab">The Lab</h2> <p>The PMML is part of the <a href="https://oden.utexas.edu/research/centers-and-groups/center-for-computational-medicine/">Center for Computational Medicine</a>, a collaboration between the Oden Institute and the Dell Medical School at The University of Texas at Austin. Established in January 2025, the Center draws on medicine, biology, engineering, mathematics, and computational science to advance personalized healthcare.</p> <p>A central theme of the Center is the development of <strong>medical digital twins</strong>: mathematical models of disease that go beyond medical imaging to incorporate modalities like genomics and metabolomics, continuously updated with personalized patient data. These models are translated into tools that help clinicians make data-driven treatment decisions based on a patient’s history and risk profile. The work is grounded in computing and machine learning, supported by the Oden Institute’s leadership in digital twin research and the high-performance computing resources at the Texas Advanced Computing Center (TACC).</p> <h2 id="what-ill-be-working-on">What I’ll Be Working On</h2> <p>My research integrates artificial intelligence, medical imaging, and computational modeling to study physiology and advance medicine. During my PhD in Mechanical Engineering at UC Berkeley, working with Prof. Shawn Shadden, I combined biomechanics, machine learning, and image-based modeling to improve vascular segmentation and simulation—work that led to the open-source tools <a href="https://github.com/numisveinsson/SeqSeg">SeqSeg</a> and MeshGrow for automated vascular reconstruction and simulation-ready mesh generation from medical images.</p> <p>At UT Austin, I am expanding this work to explore clinically driven applications of AI and simulation, with the goal of developing digital tools that bridge computational models and patient care. Joining the PMML and the broader Center for Computational Medicine is a fantastic opportunity to push these methods toward real clinical impact, alongside an incredible group of researchers spanning computational engineering and medicine.</p> <p>More to come soon!</p>]]></content><author><name>Númi Sveinsson Cepero</name></author><category term="news"/><summary type="html"><![CDATA[I joined Prof. Charley Taylor's Predictive Modeling in Medicine Lab, part of the Center for Computational Medicine at the Oden Institute and Dell Medical School, UT Austin.]]></summary></entry><entry><title type="html">Making a Vascular Model Repository — Design Decisions, Metadata, and Workflows</title><link href="https://numisveinsson.com/blog/2025/vmr/" rel="alternate" type="text/html" title="Making a Vascular Model Repository — Design Decisions, Metadata, and Workflows"/><published>2025-10-19T00:00:00+00:00</published><updated>2025-10-19T00:00:00+00:00</updated><id>https://numisveinsson.com/blog/2025/vmr</id><content type="html" xml:base="https://numisveinsson.com/blog/2025/vmr/"><![CDATA[<h2 id="introduction">Introduction</h2> <p>In many of my recent projects on <strong>patient-specific vascular modeling</strong> — from segmentation to simulation — I’ve run into the same problem over and over: managing the data.<br/> Not just storing it, but doing so in a way that’s traceable, reproducible, and easy for others (and algorithms) to use.</p> <p>That challenge became the motivation for creating a <strong>vascular model repository</strong> <a href="https://vascularmodel.com">(see VMR here)</a>— a structured system for organizing, versioning, and sharing vascular data with clear metadata and consistent workflows. What follows is an overview of the design decisions and practical trade-offs involved in building it.</p> <hr/> <h2 id="traceability-and-persistent-identifiers">Traceability and Persistent Identifiers</h2> <p>One of the most important principles is <strong>traceability</strong>.<br/> Once data enters the repository, its full history should stay visible — including updates or replacements over time.</p> <p>Each dataset gets a <strong>persistent identifier (DOI)</strong>, ensuring that anyone citing or using it can always trace back to the exact version referenced.<br/> When updates are made, the old versions remain archived and linked through a clear version history.<br/> That version lineage is what gives the data real scientific credibility.</p> <hr/> <h2 id="naming-structure-and-standardization">Naming Structure and Standardization</h2> <p>Naming conventions sound trivial until you try to merge data from multiple sources — hospitals, labs, and research groups, each with their own systems.</p> <p>The repository uses a <strong>standardized naming pattern</strong> to keep things consistent:<br/> <code class="language-plaintext highlighter-rouge">{StudyName}{PatientID}{Region}{Modality}{Version}</code><br/> Example: <code class="language-plaintext highlighter-rouge">CCTA001_LAD_CT_v2</code></p> <p>But older datasets don’t always fit. For those, we wrote <strong>mapping scripts</strong> that automatically translate legacy names into the new format.<br/> It’s a constant balance — enforcing standards without breaking compatibility with existing archives.</p> <hr/> <h2 id="hosting-and-backup">Hosting and Backup</h2> <p>Reliability starts with where the data lives.<br/> The repository runs on a <strong>dedicated research server</strong> with <strong>backups</strong>, so no single point of failure can wipe anything out.</p> <p>We should also experiment with <strong>cloud-based object storage</strong> (S3-compatible) for long-term archiving, which would make scaling and collaboration much easier while keeping version control intact.</p> <hr/> <h2 id="workflow-for-adding-new-data">Workflow for Adding New Data</h2> <p>Adding data should be simple, not chaotic.<br/> The submission process follows three main steps:</p> <ol> <li><strong>Upload</strong> — contributors upload their model files (segmentations, meshes, or simulation results).</li> <li><strong>Metadata Form</strong> — they fill in key details: study name, region, modality, preprocessing steps, and license.</li> <li><strong>Validation Check</strong> — automated scripts confirm that the files and metadata follow the required format and naming rules.</li> </ol> <p>This keeps the workflow lightweight, but structured enough to guarantee completeness and consistency.</p> <hr/> <h2 id="quality-control">Quality Control</h2> <p>Every dataset should go through <strong>quality control (QC)</strong> before it’s officially added.<br/> That includes:</p> <ul> <li>Checking geometry for intersections or topological errors</li> <li>Visual review of segmentations</li> <li>Verifying metadata consistency</li> <li>Optional short simulation runs to test validity</li> </ul> <p>Contributors should also be able to run the same QC scripts locally before submitting, which helps maintain a uniform quality standard across contributions.</p> <hr/> <h2 id="automated-and-ai-based-validation">Automated and AI-Based Validation</h2> <p>Manual review doesn’t scale forever.<br/> That’s where <strong>AI-assisted validation</strong> comes in — lightweight automated checks that flag potential issues, such as:</p> <ul> <li>Incomplete or disconnected vessel trees</li> <li>Unusual geometries</li> <li>Low-confidence segmentation areas</li> </ul> <p>These don’t replace human review but act as an early filter, keeping the process fast while maintaining trust in the data.</p> <hr/> <h2 id="data-structure-and-ml-compatibility">Data Structure and ML Compatibility</h2> <p>A big design goal was making data not just organized, but <strong>usable</strong>.<br/> Consistent folder hierarchies, standardized formats (<code class="language-plaintext highlighter-rouge">.nii.gz</code>, <code class="language-plaintext highlighter-rouge">.vtp</code>, <code class="language-plaintext highlighter-rouge">.stl</code>), and structured JSON metadata mean that ML or coding workflows can plug in directly.</p> <p>With this structure, training pipelines can automatically parse metadata, load the correct models, and run experiments — a major step toward reproducible research at scale.</p> <hr/> <h2 id="looking-ahead">Looking Ahead</h2> <p>This repository isn’t just a storage project; it’s an attempt to make vascular data <strong>reliable, transparent, and usable</strong>.<br/> Having structured, traceable datasets doesn’t just help with reproducibility — it builds trust and speeds up collaboration across groups.</p> <p>Next steps include:</p> <ul> <li>Finalizing the metadata schema and submission interface</li> <li>Releasing the first curated models with DOIs</li> </ul> <hr/>]]></content><author><name>Númi Sveinsson Cepero</name></author><category term="research"/><summary type="html"><![CDATA[Building a reproducible, standardized vascular model repository with traceability, quality control, and support for automated workflows.]]></summary></entry><entry><title type="html">SeqSeg, Now a Pip Installable Package</title><link href="https://numisveinsson.com/blog/2025/seqseg_pip/" rel="alternate" type="text/html" title="SeqSeg, Now a Pip Installable Package"/><published>2025-05-01T00:00:00+00:00</published><updated>2025-05-01T00:00:00+00:00</updated><id>https://numisveinsson.com/blog/2025/seqseg_pip</id><content type="html" xml:base="https://numisveinsson.com/blog/2025/seqseg_pip/"><![CDATA[<h2 id="1-pip-installation">1. Pip Installation</h2> <p><a href="https://pypi.org/project/seqseg/">SeqSeg</a> is now available as a pip installable package! This makes it easier to install and use in your projects. To install SeqSeg, simply run the following command in your terminal:</p> <div class="language-bash highlighter-rouge"><div class="highlight"><pre class="highlight"><code>pip <span class="nb">install </span>seqseg
</code></pre></div></div> <p>This will install the latest version of SeqSeg along with all its dependencies.</p> <h2 id="2-tutorial">2. Tutorial</h2> <p>To get started with SeqSeg, you can follow the tutorial provided in the <a href="https://github.com/numisveinsson/SeqSeg/blob/main/seqseg/tutorial/tutorial.md">SeqSeg GitHub repository</a>. The tutorial has data and code examples to help you understand how to use SeqSeg for medical image segmentation tasks. The data is the same as <a href="https://simvascular.github.io/">SimVascular</a>. Main steps in the tutorial include:</p> <ol> <li><strong>Seed Point Definition</strong>: Define seed points in the images where you want to start the segmentation.</li> <li><strong>Weight Downloading</strong>: Download the pre-trained weights for the model.</li> <li><strong>Segmentation</strong>: Run the segmentation algorithm on your images using the defined seed points and downloaded weights.</li> <li><strong>Visualization</strong>: Visualize the segmentation results to assess the performance of the model.</li> </ol>]]></content><author><name>Númi Sveinsson Cepero</name></author><category term="data-science"/><summary type="html"><![CDATA[A tutorial on setting up SeqSeg for medical image segmentation]]></summary></entry><entry><title type="html">SeqSeg, From New Dataset to Training to Inference</title><link href="https://numisveinsson.com/blog/2025/seqseg_setup/" rel="alternate" type="text/html" title="SeqSeg, From New Dataset to Training to Inference"/><published>2025-01-15T00:00:00+00:00</published><updated>2025-01-15T00:00:00+00:00</updated><id>https://numisveinsson.com/blog/2025/seqseg_setup</id><content type="html" xml:base="https://numisveinsson.com/blog/2025/seqseg_setup/"><![CDATA[<h2 id="1-data-preparation-and-structure">1. Data Preparation and Structure</h2> <p>The first step in using <a href="https://github.com/numisveinsson/SeqSeg/"><code class="language-plaintext highlighter-rouge">SeqSeg</code></a> is to preprocess your data.</p> <p>We require the following data:</p> <ul> <li>A directory containing the images named <code class="language-plaintext highlighter-rouge">images</code></li> <li>A directory containing the masks named <code class="language-plaintext highlighter-rouge">truths</code></li> <li>A directory containing the centerlines named <code class="language-plaintext highlighter-rouge">centerlines</code> <ul> <li>as <code class="language-plaintext highlighter-rouge">.vtp</code> files</li> </ul> </li> </ul> <p>A few things to note:</p> <ul> <li>The images and masks and centerlines should have the same name</li> <li>If you need to extract centerlines from masks, you can use the <code class="language-plaintext highlighter-rouge">SeqSeg/centerlines.py</code> script, or use VMTK or other tools <ul> <li>Centerlines must contain radius information in the <code class="language-plaintext highlighter-rouge">.vtp</code> file</li> </ul> </li> <li>Make sure that the masks, images and centerlines align correctly, for example open and view together in an image viewer e.g. <code class="language-plaintext highlighter-rouge">Paraview</code></li> <li>Make sure the images contain origin, spacing and direction information in the metadata <ul> <li>This is important for correct alignment before centerline extraction</li> </ul> </li> </ul> <h2 id="2-data-preprocessing-for-training">2. Data Preprocessing (for Training)</h2> <p>The next step is to preprocess the data for training. SeqSeg requires a model trained on local patches, so we need to extract patches from the images and masks based on centerlines.</p> <p>The repository for this is <a href="https://github.com/numisveinsson/vascular-segment-sampler"><code class="language-plaintext highlighter-rouge">vascular-segment-sampler</code></a>. Use <code class="language-plaintext highlighter-rouge">main_with_nnunet.py</code> to extract patches and convert them to nnU-Net format in one step. First, edit the configuration YAML in <code class="language-plaintext highlighter-rouge">config/</code> (e.g. <code class="language-plaintext highlighter-rouge">config/global.yaml</code>) so it matches your dataset, then run:</p> <div class="language-bash highlighter-rouge"><div class="highlight"><pre class="highlight"><code>python3 main_with_nnunet.py <span class="se">\</span>
    <span class="nt">--config_name</span> global <span class="se">\</span>
    <span class="nt">--data_dir</span> /path/to/data <span class="se">\</span>
    <span class="nt">--outdir</span> ./extracted_data/ <span class="se">\</span>
    <span class="nt">--num_cores</span> 4 <span class="se">\</span>
    <span class="nt">--modality</span> CT <span class="se">\</span>
    <span class="nt">--nnunet_name</span> AORTAS <span class="se">\</span>
    <span class="nt">--nnunet_dataset_number</span> 1
</code></pre></div></div> <p>Key arguments:</p> <ul> <li><code class="language-plaintext highlighter-rouge">--config_name</code> — name of the configuration file in <code class="language-plaintext highlighter-rouge">config/</code> (without <code class="language-plaintext highlighter-rouge">.yaml</code>)</li> <li><code class="language-plaintext highlighter-rouge">--data_dir</code> — directory containing <code class="language-plaintext highlighter-rouge">images/</code>, <code class="language-plaintext highlighter-rouge">truths/</code>, and <code class="language-plaintext highlighter-rouge">centerlines/</code></li> <li><code class="language-plaintext highlighter-rouge">--outdir</code> — where extracted patches and the nnU-Net dataset are written (default: <code class="language-plaintext highlighter-rouge">./extracted_data/</code>)</li> <li><code class="language-plaintext highlighter-rouge">--modality</code> — imaging modality (<code class="language-plaintext highlighter-rouge">CT</code>, <code class="language-plaintext highlighter-rouge">MR</code>, or comma-separated, e.g. <code class="language-plaintext highlighter-rouge">CT,MR</code>)</li> <li><code class="language-plaintext highlighter-rouge">--nnunet_name</code> — dataset name for nnU-Net (default: <code class="language-plaintext highlighter-rouge">AORTAS</code>)</li> <li><code class="language-plaintext highlighter-rouge">--nnunet_dataset_number</code> — nnU-Net dataset number (default: <code class="language-plaintext highlighter-rouge">1</code>)</li> </ul> <p>For a quick test on a subset of cases:</p> <div class="language-bash highlighter-rouge"><div class="highlight"><pre class="highlight"><code>python3 main_with_nnunet.py <span class="se">\</span>
    <span class="nt">--config_name</span> global <span class="se">\</span>
    <span class="nt">--data_dir</span> /path/to/data <span class="se">\</span>
    <span class="nt">--outdir</span> ./extracted_data/ <span class="se">\</span>
    <span class="nt">--modality</span> CT <span class="se">\</span>
    <span class="nt">--nnunet_name</span> AORTAS <span class="se">\</span>
    <span class="nt">--nnunet_dataset_number</span> 1 <span class="se">\</span>
    <span class="nt">--max_samples</span> 100 <span class="se">\</span>
    <span class="nt">--testing</span>
</code></pre></div></div> <p>The new data can be output anywhere, but we recommend writing directly into the nnU-Net Raw directory (or copying the resulting <code class="language-plaintext highlighter-rouge">DatasetXXX_*</code> folder there).</p> <h2 id="3-training">3. Training</h2> <p>The next step is to train the model with <a href="https://github.com/MIC-DKFZ/nnUNet"><code class="language-plaintext highlighter-rouge">nnU-Net</code></a> (see the <a href="https://github.com/MIC-DKFZ/nnUNet/blob/master/documentation/how_to_use_nnunet.md">documentation</a> for more details). Make sure <code class="language-plaintext highlighter-rouge">nnUNet_raw</code>, <code class="language-plaintext highlighter-rouge">nnUNet_preprocessed</code>, and <code class="language-plaintext highlighter-rouge">nnUNet_results</code> are set, and that the dataset from step 2 is in <code class="language-plaintext highlighter-rouge">nnUNet_raw</code>.</p> <h3 id="preprocessing">Preprocessing</h3> <p>Run fingerprint extraction, experiment planning, and preprocessing:</p> <div class="language-bash highlighter-rouge"><div class="highlight"><pre class="highlight"><code>nnUNetv2_plan_and_preprocess <span class="nt">-d</span> 1 <span class="nt">--verify_dataset_integrity</span>
</code></pre></div></div> <p>Replace <code class="language-plaintext highlighter-rouge">1</code> with the <code class="language-plaintext highlighter-rouge">--nnunet_dataset_number</code> you used above. Use <code class="language-plaintext highlighter-rouge">--verify_dataset_integrity</code> the first time you run this. To preprocess only a specific configuration:</p> <div class="language-bash highlighter-rouge"><div class="highlight"><pre class="highlight"><code>nnUNetv2_plan_and_preprocess <span class="nt">-d</span> 1 <span class="nt">-c</span> 3d_fullres
</code></pre></div></div> <h3 id="training">Training</h3> <p>Train a fold with:</p> <div class="language-bash highlighter-rouge"><div class="highlight"><pre class="highlight"><code>nnUNetv2_train DATASET_NAME_OR_ID CONFIGURATION FOLD
</code></pre></div></div> <p>For example, with dataset <code class="language-plaintext highlighter-rouge">1</code> (<code class="language-plaintext highlighter-rouge">Dataset001_AORTAS</code>), train fold 0 of a 3D full-resolution model:</p> <div class="language-bash highlighter-rouge"><div class="highlight"><pre class="highlight"><code>nnUNetv2_train 1 3d_fullres 0
</code></pre></div></div> <p>Repeat for folds <code class="language-plaintext highlighter-rouge">0</code>–<code class="language-plaintext highlighter-rouge">4</code> (or train fold <code class="language-plaintext highlighter-rouge">all</code> for a single model on all training cases). Other common configurations:</p> <div class="language-bash highlighter-rouge"><div class="highlight"><pre class="highlight"><code>nnUNetv2_train 1 2d 0
nnUNetv2_train 1 3d_lowres 0
nnUNetv2_train 1 3d_fullres 0
</code></pre></div></div> <p>Add <code class="language-plaintext highlighter-rouge">--npz</code> if you plan to use <code class="language-plaintext highlighter-rouge">nnUNetv2_find_best_configuration</code> later. Resume an interrupted run with <code class="language-plaintext highlighter-rouge">--c</code>.</p> <h2 id="4-inference">4. Inference</h2> <p>The final step is to run <a href="https://github.com/numisveinsson/SeqSeg/"><code class="language-plaintext highlighter-rouge">SeqSeg</code></a> inference on new data. This is done with the <code class="language-plaintext highlighter-rouge">SeqSeg/seqseg.py</code> script. You need direct access to the directory containing the images and seed points, and another containing the trained model weights.</p>]]></content><author><name>Númi Sveinsson Cepero</name></author><category term="data-science"/><summary type="html"><![CDATA[A tutorial on setting up SeqSeg for medical image segmentation]]></summary></entry><entry><title type="html">ParaView Tutorial</title><link href="https://numisveinsson.com/blog/2024/paraview/" rel="alternate" type="text/html" title="ParaView Tutorial"/><published>2024-09-24T00:00:00+00:00</published><updated>2024-09-24T00:00:00+00:00</updated><id>https://numisveinsson.com/blog/2024/paraview</id><content type="html" xml:base="https://numisveinsson.com/blog/2024/paraview/"><![CDATA[<h3 id="data-visualization">Data Visualization</h3> <p>Data visualization is an essential tool for scientists and engineers to explore and communicate complex data. Visualization allows us to gain insights into our data, identify patterns, and communicate our findings effectively. ParaView is a powerful scientific visualization tool that enables users to visualize and analyze large datasets in 2D and 3D. It supports a wide range of data formats and provides a variety of visualization and analysis tools. Examples of data that can be visualized in ParaView include computational fluid dynamics simulations, geospatial data, medical imaging data, and more.</p> <p>In this tutorial, we’ll cover the basics of using ParaView for scientific visualization. We’ll explore how to load data, visualize data in 2D and 3D, apply filters for data analysis, and export visualizations for publication.</p> <h3 id="what-is-paraview">What is ParaView?</h3> <p>ParaView is an open-source, multi-platform data analysis and visualization application. It is designed to handle large datasets and provides a range of visualization and analysis tools for scientific and engineering applications. ParaView supports a variety of data formats, including structured and unstructured grids, point clouds, and images.</p> <div class="l-body"> <p><img src="/assets/img/paraview.png" alt="ParaView Logo" width="700"/></p> </div> <h3 id="getting-started-with-paraview">Getting Started with ParaView</h3> <p>To get started with ParaView, you can download the latest version of the software from the <a href="https://www.paraview.org/download/">ParaView website</a>. ParaView is available for Windows, macOS, and Linux operating systems. Once you have downloaded and installed ParaView, you can launch the application and start exploring its features.</p> <h3 id="loading-data">Loading Data</h3> <p>ParaView supports a wide range of data formats, including VTK, XML, CSV, and more. To load data into ParaView, follow these steps:</p> <ol> <li>Launch ParaView.</li> <li>Click on the “Open” button in the toolbar.</li> <li>Browse to the location of your data file and select it.</li> <li>Click “OK” to load the data.</li> </ol> <h3 id="visualizing-data">Visualizing Data</h3> <p>Once you have loaded data into ParaView, you can visualize it in 2D and 3D. ParaView provides a variety of visualization options, including contour plots, volume rendering, and streamlines. To visualize data in ParaView, follow these steps:</p> <ol> <li>Select the data you want to visualize in the Pipeline Browser.</li> <li>Click on the “Apply” button in the toolbar to apply the default visualization.</li> <li>Use the Display panel to customize the visualization, such as changing the color map, opacity, and lighting.</li> </ol> <h3 id="filters-and-data-analysis">Filters and Data Analysis</h3> <p>ParaView provides a range of filters for data analysis and manipulation. Filters allow you to extract information from your data, apply transformations, and perform calculations.</p> <p>To apply a filter in ParaView, follow these steps:</p> <ol> <li>Select the data you want to filter in the Pipeline Browser.</li> <li>Click on the “Filters” menu and select the desired filter.</li> <li>Configure the filter parameters in the Properties panel.</li> <li>Click “Apply” to apply the filter to the data.</li> </ol> <h3 id="favorite-filters">Favorite Filters</h3> <p>Some of my favorite filters in ParaView include:</p> <ul> <li><strong>Contour</strong>: Useful for visualizing isocontours of scalar data.</li> <li><strong>Clip</strong>: Great for cutting away parts of the dataset to reveal internal structures.</li> <li><strong>Slice</strong>: Useful for extracting 2D slices from 3D datasets.</li> <li><strong>Threshold</strong>: Handy for filtering data based on scalar values.</li> <li><strong>Stream Tracer</strong>: Useful for visualizing flow fields and streamlines.</li> <li><strong>Glyph</strong>: Great for visualizing vector fields with glyphs.</li> <li><strong>Warp by Scalar</strong>: Useful for deforming the dataset based on scalar values. This is great for visualizing deformation fields.</li> </ul> <h3 id="visualizing-3d-medical-image-data">Visualizing 3D Medical Image Data</h3> <p>ParaView is a powerful tool for visualizing 3D medical image data, such as MRI and CT scans. It provides a range of tools for volume rendering, segmentation, and surface extraction. To visualize 3D medical image data in ParaView, follow these steps:</p> <ol> <li>Load the medical image data into ParaView.</li> <li>Apply a volume rendering filter to visualize the data in 3D.</li> <li>Choose isosurface as blend mode and adjust the opacity and color map.</li> <li>Use the segmentation tools to extract regions of interest.</li> <li>Apply surface extraction filters to create 3D surface meshes.</li> </ol> <h3 id="saving-and-exporting-data">Saving and Exporting Data</h3> <p>Once you have created a visualization in ParaView, you can save it in a variety of formats for publication and sharing. ParaView supports a range of file formats, including images, videos, and 3D models.</p> <p>To save a visualization in ParaView, follow these steps:</p> <ol> <li>Click on the “File” menu and select “Save Screenshot” to save an image of the visualization.</li> <li>Click on the “File” menu and select “Save Animation” to save a video of the visualization.</li> <li>Click on the “File” menu and select “Export Scene” to save the visualization as a ParaView state file.</li> </ol> <h3 id="conclusion">Conclusion</h3> <p>ParaView is a powerful scientific visualization tool that enables users to explore and analyze complex datasets in 2D and 3D. In this tutorial, we covered the basics of using ParaView for data visualization, including loading data, visualizing data, applying filters, and exporting visualizations. ParaView is a versatile tool that is widely used in scientific research, engineering, and data analysis. I hope this tutorial has provided you with a solid foundation for using ParaView in your own work. Happy visualizing!</p>]]></content><author><name>Númi Sveinsson Cepero</name></author><category term="data-science"/><summary type="html"><![CDATA[A beginner-friendly tutorial on using ParaView for scientific visualization]]></summary></entry><entry><title type="html">Python 101 (3) Github</title><link href="https://numisveinsson.com/blog/2024/github/" rel="alternate" type="text/html" title="Python 101 (3) Github"/><published>2024-03-07T00:00:00+00:00</published><updated>2024-03-07T00:00:00+00:00</updated><id>https://numisveinsson.com/blog/2024/github</id><content type="html" xml:base="https://numisveinsson.com/blog/2024/github/"><![CDATA[<p>Welcome to part 3 of the Python 101 series! In this post, we’ll cover the basics of using Github to manage code development. Whether you’re working on a solo project or collaborating with a team, understanding the fundamentals of using Github is essential. We’ll cover the following topics:</p> <h3 id="whats-the-difference-between-git-and-github">What’s the Difference Between Git and Github?</h3> <p>We’ve already covered the basics of using Git in a previous post. In summary, Git is a powerful <em>version control system</em> that helps developers manage and track changes in their codebase efficiently. Whether you’re working on a solo project or collaborating with a team, understanding the basics of Git is essential. Github, on the other hand, is a <em>web-based platform that provides hosting for software development and version control</em> using Git. It offers distributed version control and source code management functionality of Git, plus its own features. Github is a popular platform for open-source projects and collaborative development. It provides a range of features, including issue tracking, pull requests, and project management tools.</p> <h3 id="setting-up-a-github-account">Setting Up a Github Account</h3> <p>If you don’t already have a Github account, you can sign up for one at <a href="https://github.com">github.com</a>. Once you have an account, you can create and manage repositories, collaborate with others, and contribute to open-source projects.</p> <h3 id="creating-a-new-repository-on-github">Creating a New Repository on Github</h3> <p>You can create a new repository on Github to host your code and collaborate with others.</p> <p>To create a new repository on Github, follow these steps:</p> <ol> <li>Log in to your Github account.</li> <li>Click on the “+” icon in the top right corner of the page and select “New repository.”</li> <li>Enter a name for your repository, and optionally, a description.</li> <li>Choose whether the repository will be public or private.</li> <li>Select the “Initialize this repository with a README” checkbox.</li> </ol> <h3 id="linking-a-local-repository-to-a-github-repository">Linking a Local Repository to a Github Repository</h3> <p>Once you have created a repository on Github, you can link it to a local repository on your machine. This allows you to push changes from your local repository to the remote repository on Github.</p> <p>To link a local repository to a Github repository, follow these steps:</p> <ol> <li>Open a terminal or command prompt on your local machine.</li> <li>Navigate to the directory where your local repository is located.</li> <li>Run the following command to add the remote repository URL, replacing <code class="language-plaintext highlighter-rouge">&lt;repository_url&gt;</code> with the URL of your Github repository:</li> </ol> <div class="language-bash highlighter-rouge"><div class="highlight"><pre class="highlight"><code>git remote add origin &lt;repository_url&gt;
</code></pre></div></div> <h3 id="cloning-a-repository">Cloning a Repository</h3> <p>Cloning a repository allows you to create a local copy of a Github repository on your machine. This is useful if you want to work on a project locally, make changes, and then push those changes back to the remote repository on Github.</p> <p>To clone a repository from Github to your local machine, follow these steps:</p> <ol> <li>Navigate to the repository on Github.</li> <li>Click on the “Code” button to reveal the repository URL.</li> <li>Copy the repository URL.</li> <li>Open a terminal or command prompt on your local machine.</li> <li>Navigate to the directory where you want to clone the repository.</li> <li>Run the following command, replacing <code class="language-plaintext highlighter-rouge">&lt;repository_url&gt;</code> with the URL you copied:</li> </ol> <div class="language-bash highlighter-rouge"><div class="highlight"><pre class="highlight"><code>git clone &lt;repository_url&gt;
</code></pre></div></div> <h3 id="pushing-changes-to-github">Pushing Changes to Github</h3> <p>Once you have made changes to your local repository, you can push those changes to the remote repository on Github.</p> <p>To push changes to Github, follow these steps:</p> <ol> <li>Open a terminal or command prompt on your local machine.</li> <li>Navigate to the directory where your local repository is located.</li> <li>Run the following command to push your changes to the remote repository on Github:</li> </ol> <div class="language-bash highlighter-rouge"><div class="highlight"><pre class="highlight"><code>git push origin master
</code></pre></div></div> <h3 id="pulling-changes-from-github">Pulling Changes from Github</h3> <p>If changes have been made to the remote repository on Github, you can pull those changes to your local repository.</p> <p>To pull changes from Github, follow these steps:</p> <ol> <li>Open a terminal or command prompt on your local machine.</li> <li>Navigate to the directory where your local repository is located.</li> <li>Run the following command to pull changes from the remote repository on Github:</li> </ol> <div class="language-bash highlighter-rouge"><div class="highlight"><pre class="highlight"><code>git pull origin master
</code></pre></div></div> <h3 id="creating-a-pull-request">Creating a Pull Request</h3> <p>If you’re collaborating with others on a project, you can create a pull request to propose changes to the codebase. This allows others to review your changes and merge them into the main codebase.</p> <p>To create a pull request on Github, follow these steps:</p> <ol> <li>Navigate to the repository on Github.</li> <li>Click on the “Pull requests” tab.</li> <li>Click on the “New pull request” button.</li> <li>Select the branch that contains your changes.</li> <li>Review the changes and add a description.</li> <li>Click on the “Create pull request” button.</li> </ol> <h3 id="public-vs-private-repositories">Public vs. Private Repositories</h3> <p>Github allows you to create both public and private repositories. Public repositories are visible to anyone, and anyone can fork and contribute to them. Private repositories, on the other hand, are only visible to you and any collaborators you invite. You can choose the visibility of your repository when creating it on Github.</p> <h3 id="using-github-copilot">Using Github Copilot</h3> <p>Github Copilot is a feature I’ve found very useful. It is an AI-powered code completion tool that helps you write code faster and with fewer errors. It is built on OpenAI’s Codex model and provides intelligent code suggestions based on the context of your code. Github Copilot is available as a Visual Studio Code extension and can be used to write code in a variety of programming languages, including Python.</p> <p><strong>Usage</strong>: I link it to VSCode. It requires internet connection to work.</p> <p><strong>Important Note:</strong> Github Copilot is a powerful tool, but it’s important to review the code suggestions it provides and ensure that they align with your project’s requirements and coding standards.</p> <h3 id="conclusion">Conclusion</h3> <p>That’s it! You’ve now covered the basics of using Github to manage code development. Happy coding!</p>]]></content><author><name>Númi Sveinsson Cepero</name></author><category term="python"/><summary type="html"><![CDATA[using Github to manage code development]]></summary></entry></feed>